2022 Jeep Grand Cherokee Owner’s Manual — Vehicle Maintenance
Servicing and Maintenance
An authorized dealer has the qualified service personnel, special tools, and equipment to perform all service operations in an expert manner. Service Manuals are available which include detailed service information for your vehicle. Refer to these Service Manuals before attempting any procedure yourself.
Note:
Intentional tampering with emissions control systems may void your warranty and could result in civil penalties being assessed against you.
WARNING:
You can be badly injured working on or around a motor vehicle. Only do service work for which you have the knowledge and the proper equipment. If you have any doubt about your ability to perform a service job, take your vehicle to a competent mechanic.
ENGINE OIL
ENGINE OIL SELECTION
Use only the manufacturer's recommended fluid .
Note:
Hemi engines at times can tick right after startup and then quiet down after approximately 30 seconds. This is normal and will not harm the engine. This characteristic can be caused by short drive cycles. For example, if the vehicle is started then shut off after driving a short distance. Upon restarting, you may experience a ticking sound. Other causes could be if the vehicle is unused for an extended period of time, incorrect oil, extended oil changes or extended idling. If the engine continues to tick or if the Malfunction Indicator Light (MIL) comes on, see the nearest authorized dealer.
AMERICAN PETROLEUM INSTITUTE (API) APPROVED ENGINE OIL
These symbols mean that the oil has been certified by the API. The manufacturer only recommends API trademark oils.
 The API Starburst trademark certifies 0W-20, 0W-30 and 5W-30 engine oils.
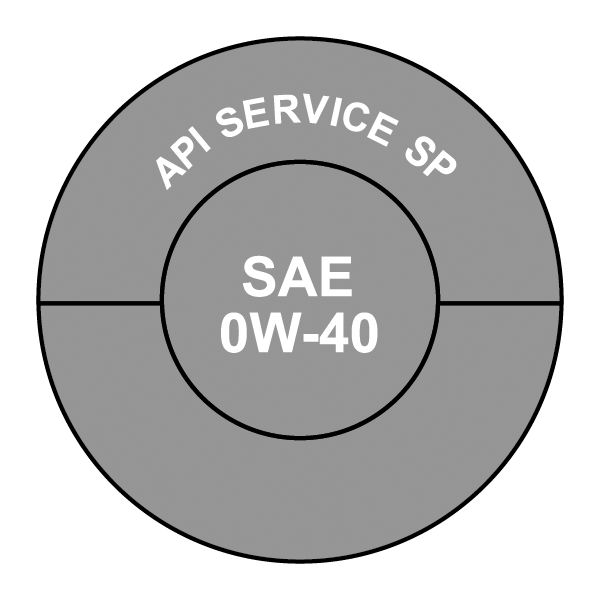 The API Donut trademark certifies 0W-40 and 5W-40 engine oil.
CAUTION:
Do not use chemical flushes in your engine oil as the chemicals can damage your engine. Such damage is not covered by the New Vehicle Limited Warranty.
SYNTHETIC ENGINE OILS
Your engine was designed for synthetic engine oils, only use synthetic API approved engine oils.
Synthetic engine oils which do not have both the correct API trademark and the correct SAE viscosity grade numbers should not be used.
MATERIALS ADDED TO ENGINE OIL
The manufacturer strongly recommends against the addition of any additives (other than leak detection dyes) to the engine oil. Engine oil is an engineered product and its performance may be impaired by supplemental additives.
DISPOSING OF USED ENGINE OIL AND OIL FILTERS
Care should be taken in disposing of used engine oil and oil filters from your vehicle. Used oil and oil filters, indiscriminately discarded, can present a problem to the environment. Contact an authorized dealer, service station or governmental agency for advice on how and where used oil and oil filters can be safely discarded in your area.
ENGINE OIL FILTER
The engine oil filter should be replaced with a new filter at every engine oil change.
Engine Oil Filter Selection
A full-flow type disposable oil filter should be used for replacement. The quality of replacement filters varies considerably. Only high quality Mopar® filters should be used.
ENGINE AIR CLEANER FILTER
For the proper maintenance intervals .
WARNING:
The air induction system (air cleaner, hoses, etc.) can provide a measure of protection in the case of engine backfire. Do not remove the air induction system (air cleaner, hoses, etc.) unless such removal is necessary for repair or maintenance. Make sure that no one is near the engine compartment before starting the vehicle with the air induction system (air cleaner, hoses, etc.) removed. Failure to do so can result in serious personal injury.
Engine Air Cleaner Filter Selection
The quality of replacement engine air cleaner filters varies considerably. Only high quality Mopar® filters should be used.
ENGINE AIR CLEANER FILTER INSPECTION AND REPLACEMENT
Engine Air Cleaner Filter Removal
-
With a suitable tool, fully loosen fasteners on the engine air cleaner filter cover.
-
Lift the engine air cleaner filter cover at the outside edge, tipping it while pushing inboard to detach the cover from the lower shell at the hinge to access the engine air cleaner filter.
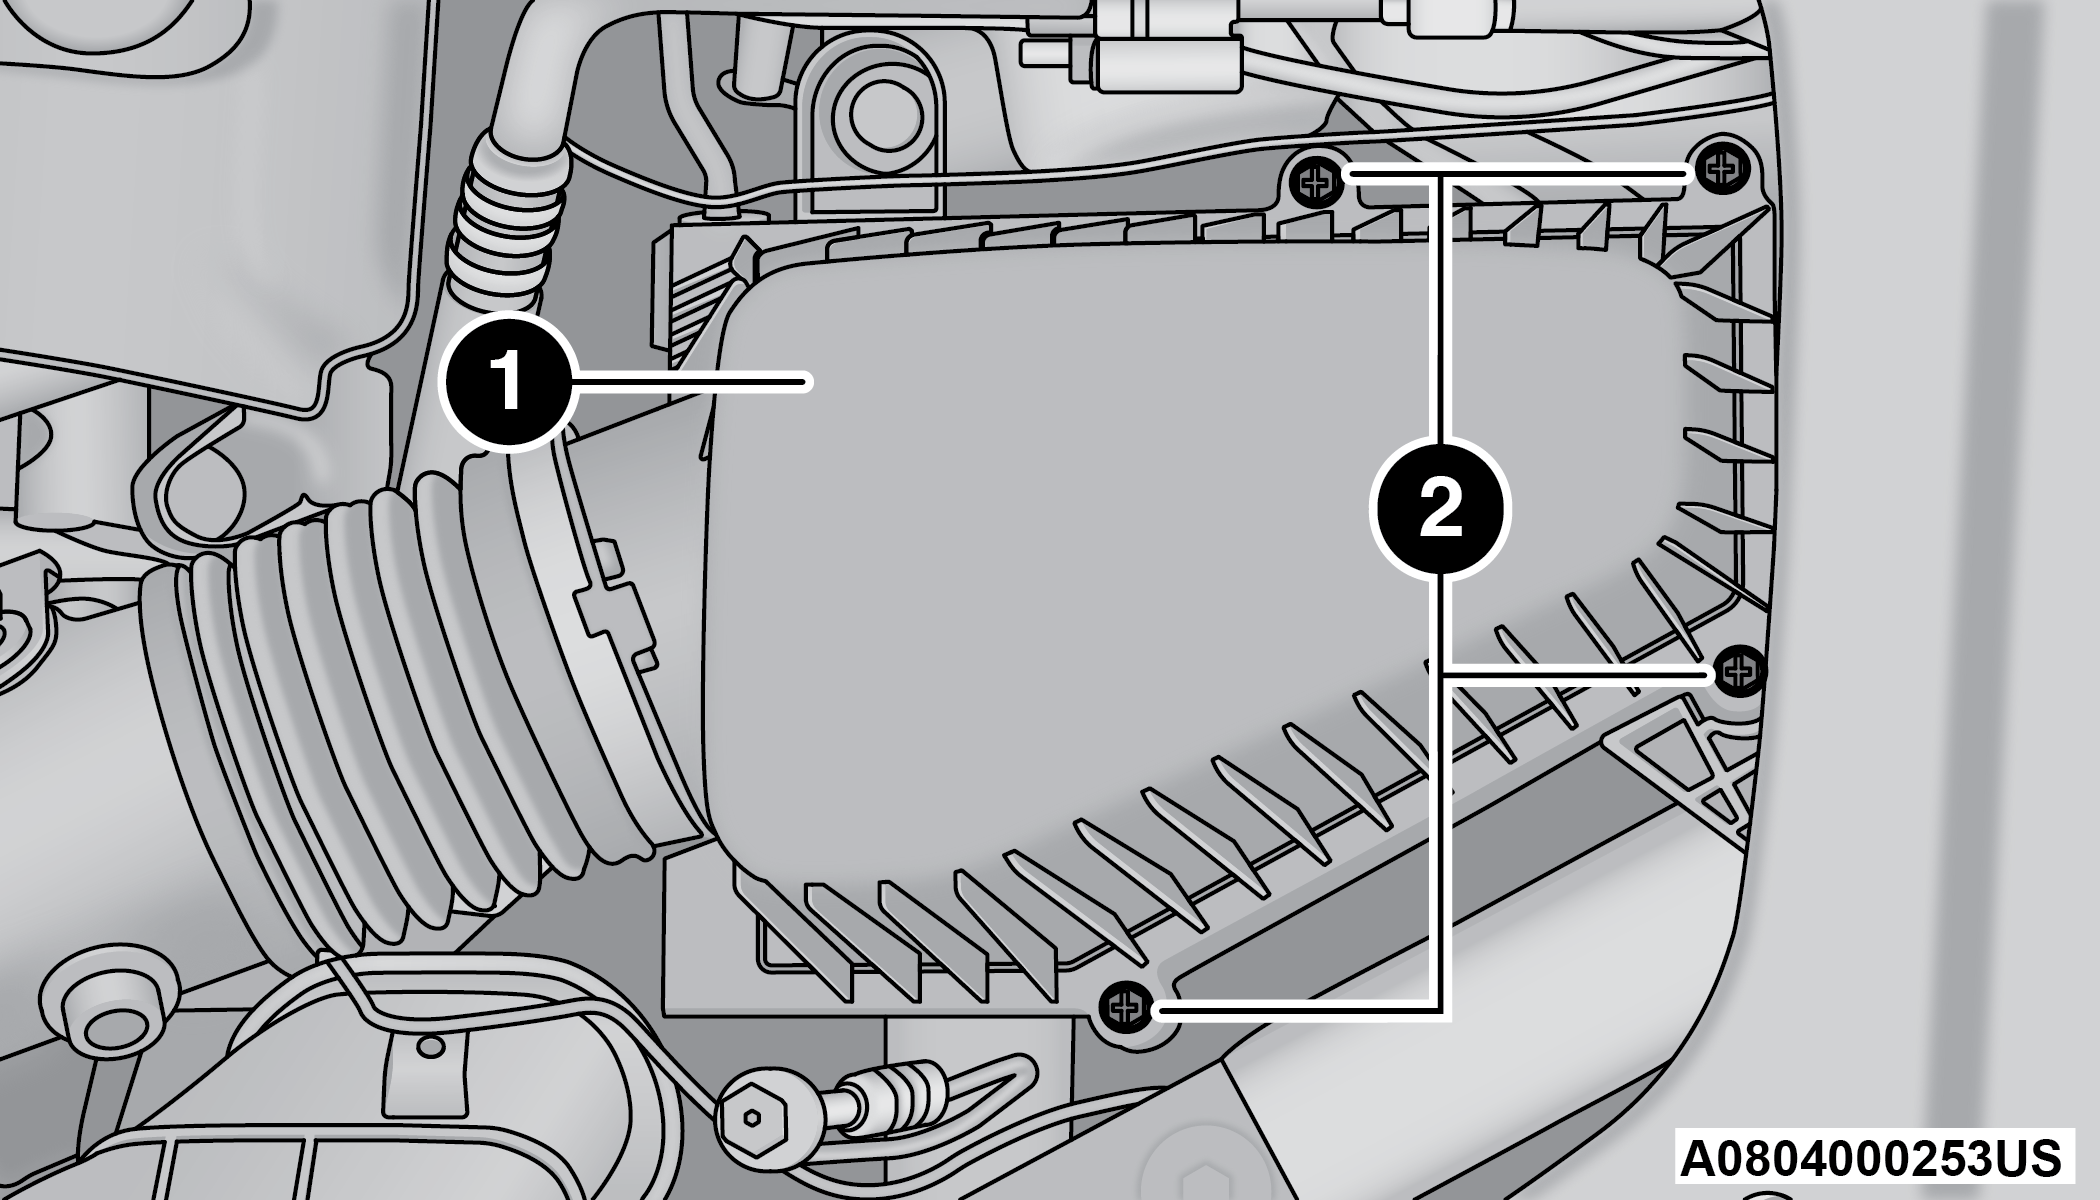
Engine Air Cleaner Filter Cover
1 — Engine Air Cleaner Filter Cover
2 — Fasteners
-
Remove the engine air cleaner filter from the housing assembly.
Engine Air Cleaner Filter Installation
Note:
Inspect and clean the housing assembly if significant dirt or debris is present before replacing the engine air cleaner filter.
-
Install the engine air cleaner filter into the housing assembly with the engine air cleaner filter inspection surface facing downward.
-
Install the engine air cleaner filter cover onto the housing assembly locating tabs.
-
Tighten the fasteners on the engine air cleaner filter assembly.
CAUTION:
Do not overtighten the engine air cleaner filter cover lid screws or damage to the cover may result.
AIR CONDITIONER MAINTENANCE
For best possible performance, your air conditioner should be checked and serviced by an authorized dealer at the start of each warm season. This service should include cleaning of the condenser fins and a performance test. Drive belt tension should also be checked at this time.
WARNING:
Use only refrigerants and compressor lubricants approved by the manufacturer for your air conditioning system. Some unapproved refrigerants are flammable and can explode, injuring you. Other unapproved refrigerants or lubricants can cause the system to fail, requiring costly repairs. Refer to Warranty Information Book, for further warranty information.
The air conditioning system contains refrigerant under high pressure. To avoid risk of personal injury or damage to the system, adding refrigerant or any repair requiring lines to be disconnected should be done by an experienced technician.
CAUTION:
Do not use chemical flushes in your air conditioning system as the chemicals can damage your air conditioning components. Such damage is not covered by the New Vehicle Limited Warranty.
REFRIGERANT RECOVERY AND RECYCLING — R–1234YF
R–1234yf Air Conditioning Refrigerant is a Hydrofluoroolefin (HFO) that is endorsed by the Environmental Protection Agency and is an ozone-friendly substance with a low global-warming potential. The manufacturer recommends that air conditioning service be performed by an authorized dealer using recovery and recycling equipment.
Note:
Use only manufacturer approved A/C system PAG compressor oil, and refrigerants.
CABIN AIR FILTER REPLACEMENT
For the proper maintenance intervals .
WARNING:
Do not remove the cabin air filter while the vehicle is running, or while the ignition is in the ON/RUN position. With the cabin air filter removed and the blower operating, the blower can contact hands and may propel dirt and debris into your eyes, resulting in personal injury.
The cabin air filter is located in the fresh air inlet behind the glove compartment. Perform the following procedure to replace the filter:
-
Open the glove compartment and remove all contents.
-
There is a glove compartment travel stop on the right side of the glove compartment door, partially close the glove compartment door and pull the travel stop toward you to release the glove compartment travel stop.
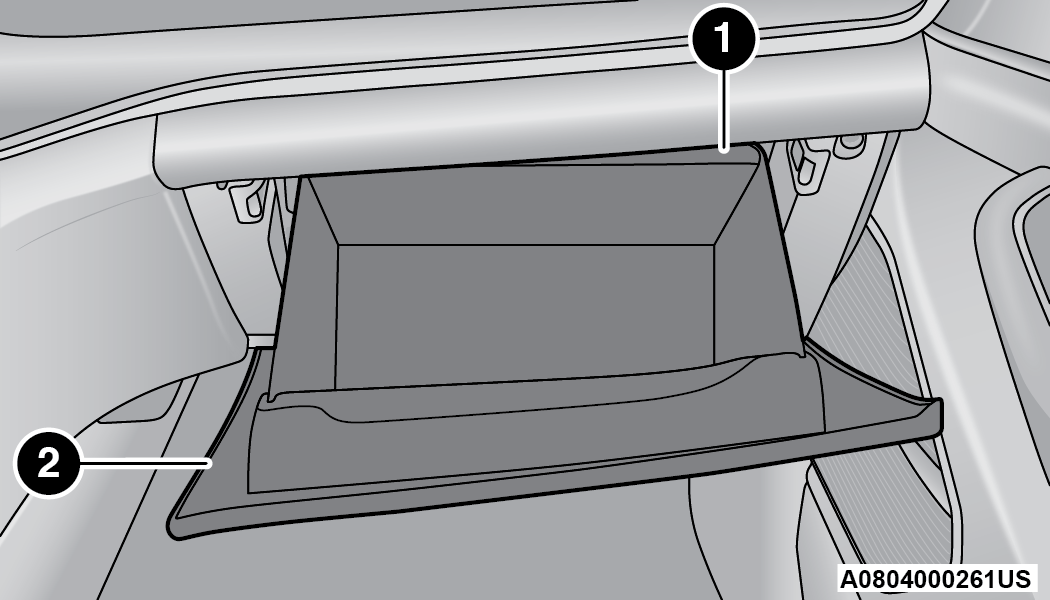
Glove Compartment
1 — Glove Compartment Travel Stop
2 — Glove Compartment Door
-
With the glove compartment door loose, remove the glove compartment tension tether and tether clip by sliding the clip toward the face of the glove compartment door and lifting the clip out of glove compartment door.
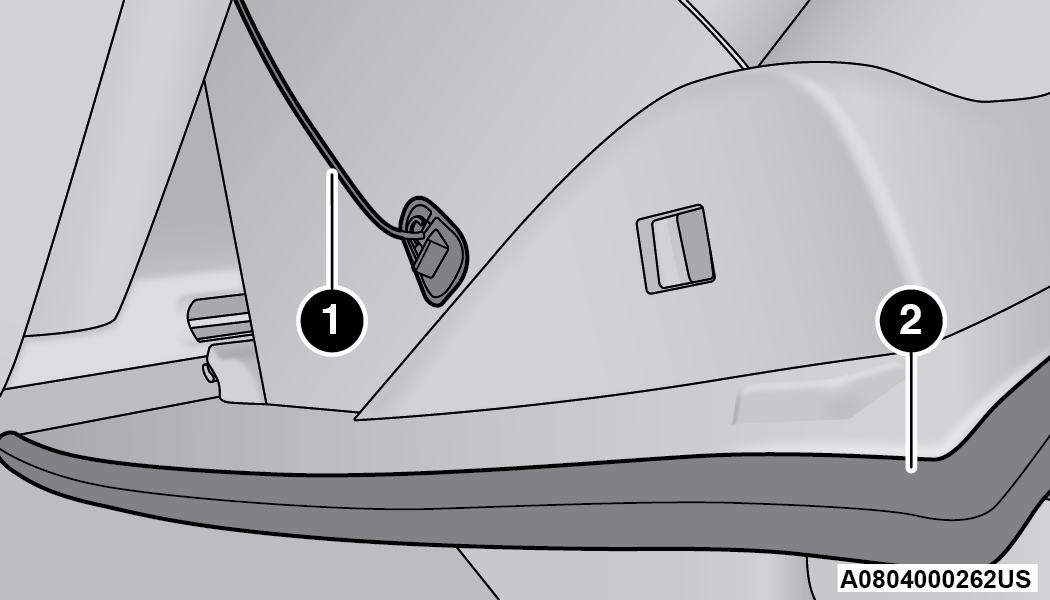
Right Side Of Glove Compartment
1 — Glove Compartment Tension Tether
2 — Glove Compartment Door
-
Lower the glove compartment door to the floor.
-
Squeeze the retaining tabs together that secures the cabin air filter cover to the HVAC housing. Unhinge the filter cover on the right side to fully remove the cover.
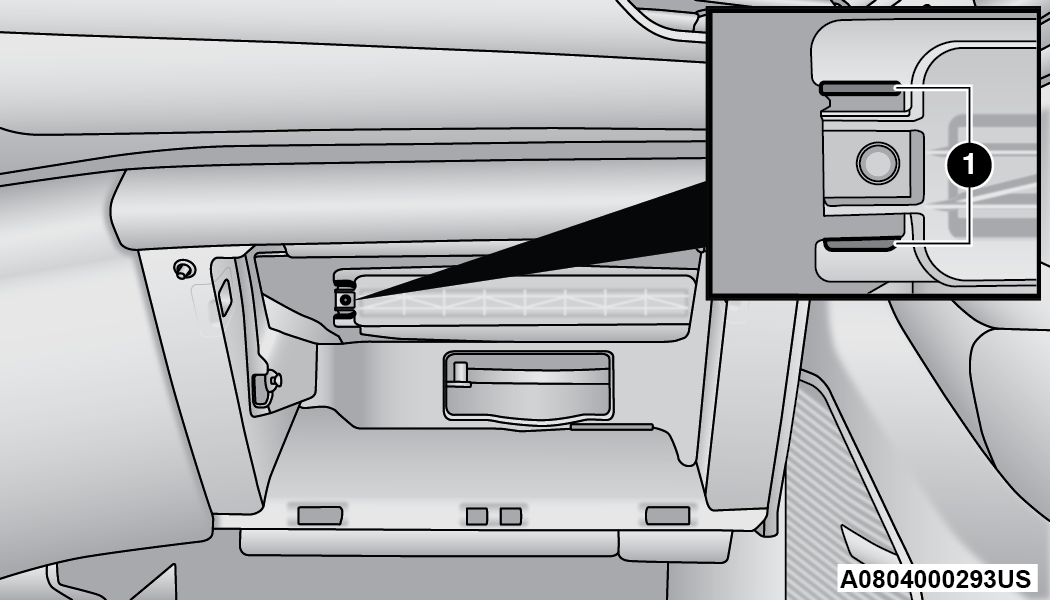
Cabin Air Filter Cover
1 — Retaining Tabs
-
Remove the cabin air filter by pulling it straight out of the housing.
-
Install the cabin air filter with the arrow on the filter pointing toward the floor. When installing the filter cover, make sure the retaining tabs fully engage into the HVAC housing.
CAUTION:
The cabin air filter is identified with an arrow to indicate airflow direction through the filter. Failure to properly install the filter will result in the need to replace it more often.
-
Lift the glove compartment door up and reattach the tension tether by inserting the tether clip in the glove compartment and sliding the clip away from the face of the glove compartment door.
-
Push the door to the near closed position to reengage the glove compartment travel stops.
Note:
Ensure the glove compartment travel stops are fully engaged.
ACCESSORY DRIVE BELT INSPECTION
WARNING:
Do not attempt to inspect an accessory drive belt with vehicle running.
When working near the radiator cooling fan, disconnect the fan motor lead. The fan is temperature controlled and can start at any time regardless of ignition mode. You could be injured by the moving fan blades.
You can be badly injured working on or around a motor vehicle. Only do service work for which you have the knowledge and the proper equipment. If you have any doubt about your ability to perform a service job, take your vehicle to a competent mechanic.
When inspecting accessory drive belts, small cracks that run across ribbed surface of belt from rib to rib, are considered normal. These are not a reason to replace belt. However, cracks running along a rib (not across) are not normal. Any belt with cracks running along a rib must be replaced. Also have the belt replaced if it has excessive wear, frayed cords or severe glazing.
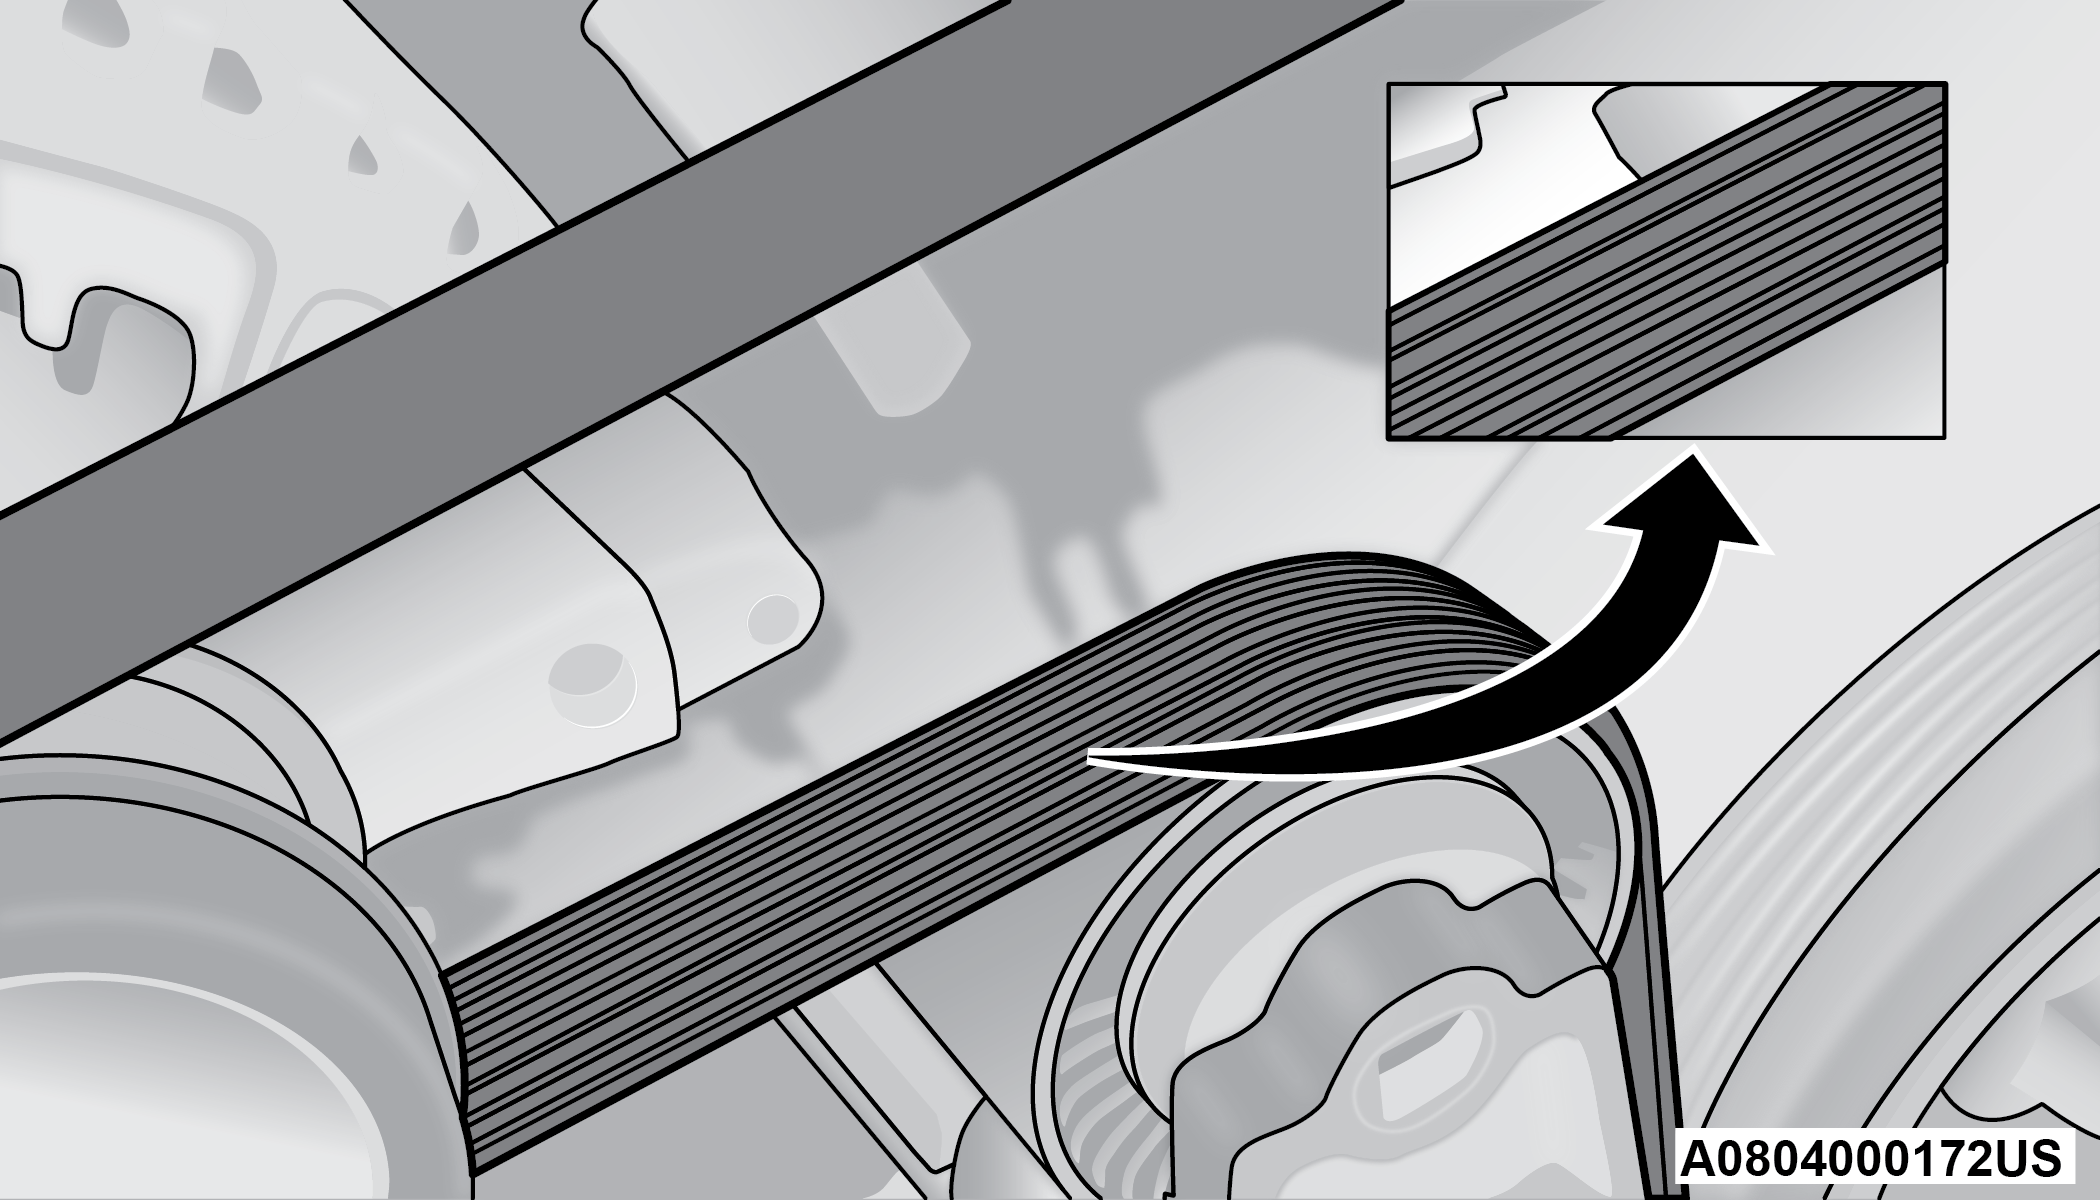
Accessory Belt (Serpentine Belt)
Conditions that would require replacement:
Rib chunking (one or more ribs has separated from belt body)
Rib or belt wear
Longitudinal belt cracking (cracks between two ribs)
Belt slips
Groove jumping (belt does not maintain correct position on pulley)
Belt broken (identify and correct problem before new belt is installed)
Noise (objectionable squeal, squeak, or rumble is heard or felt while drive belt is in operation)
Some conditions can be caused by a faulty component such as a belt pulley. Belt pulleys should be carefully inspected for damage and proper alignment.
Belt replacement on some models requires the use of special tools, we recommend having your vehicle serviced at an authorized dealer.
BODY LUBRICATION
Locks and all body pivot points, including such items as seat tracks, door hinge pivot points and rollers, liftgate, tailgate, decklid, sliding doors and hood hinges, should be lubricated periodically with a lithium-based grease, such as Mopar® Spray White Lube to ensure quiet, easy operation and to protect against rust and wear. Prior to the application of any lubricant, the parts concerned should be wiped clean to remove dust and grit; after lubricating excess oil and grease should be removed. Particular attention should also be given to hood latching components to ensure proper function. When performing other underhood services, the hood latch, release mechanism and safety catch should be cleaned and lubricated.
The external lock cylinders should be lubricated twice a year, preferably in the Autumn and Spring. Apply a small amount of a high quality lubricant, such as Mopar® Lock Cylinder Lubricant directly into the lock cylinder.
WINDSHIELD WIPER BLADES
Clean the rubber edges of the wiper blades and the windshield periodically with a sponge or soft cloth and a mild nonabrasive cleaner. This will remove accumulations of salt or road film.
Operation of the wipers on dry glass for long periods may cause deterioration of the wiper blades. Always use washer fluid when using the wipers to remove salt or dirt from a dry windshield.
Avoid using the wiper blades to remove frost or ice from the windshield. Keep the blade rubber out of contact with petroleum products such as engine oil, gasoline, etc.
Note:
Life expectancy of wiper blades varies depending on geographical area and frequency of use. Poor performance of blades may be present with chattering, marks, water lines or wet spots. If any of these conditions are present, clean the wiper blades or replace as necessary.
The wiper blades and wiper arms should be inspected periodically, not just when wiper performance problems are experienced. This inspection should include the following points:
Wear or uneven edges
Foreign material
Hardening or cracking
Deformation or fatigue
If a wiper blade or wiper arm is damaged, replace the affected wiper arm or blade with a new unit. Do not attempt to repair a wiper arm or blade that is damaged.
FRONT WIPER BLADE REMOVAL/INSTALLATION
CAUTION:
Do not allow the wiper arm to spring back against the glass without the wiper blade in place or the glass may be damaged.
-
Lift the wiper arm to raise the wiper blade off of the glass, until the wiper arm is in the full up position.
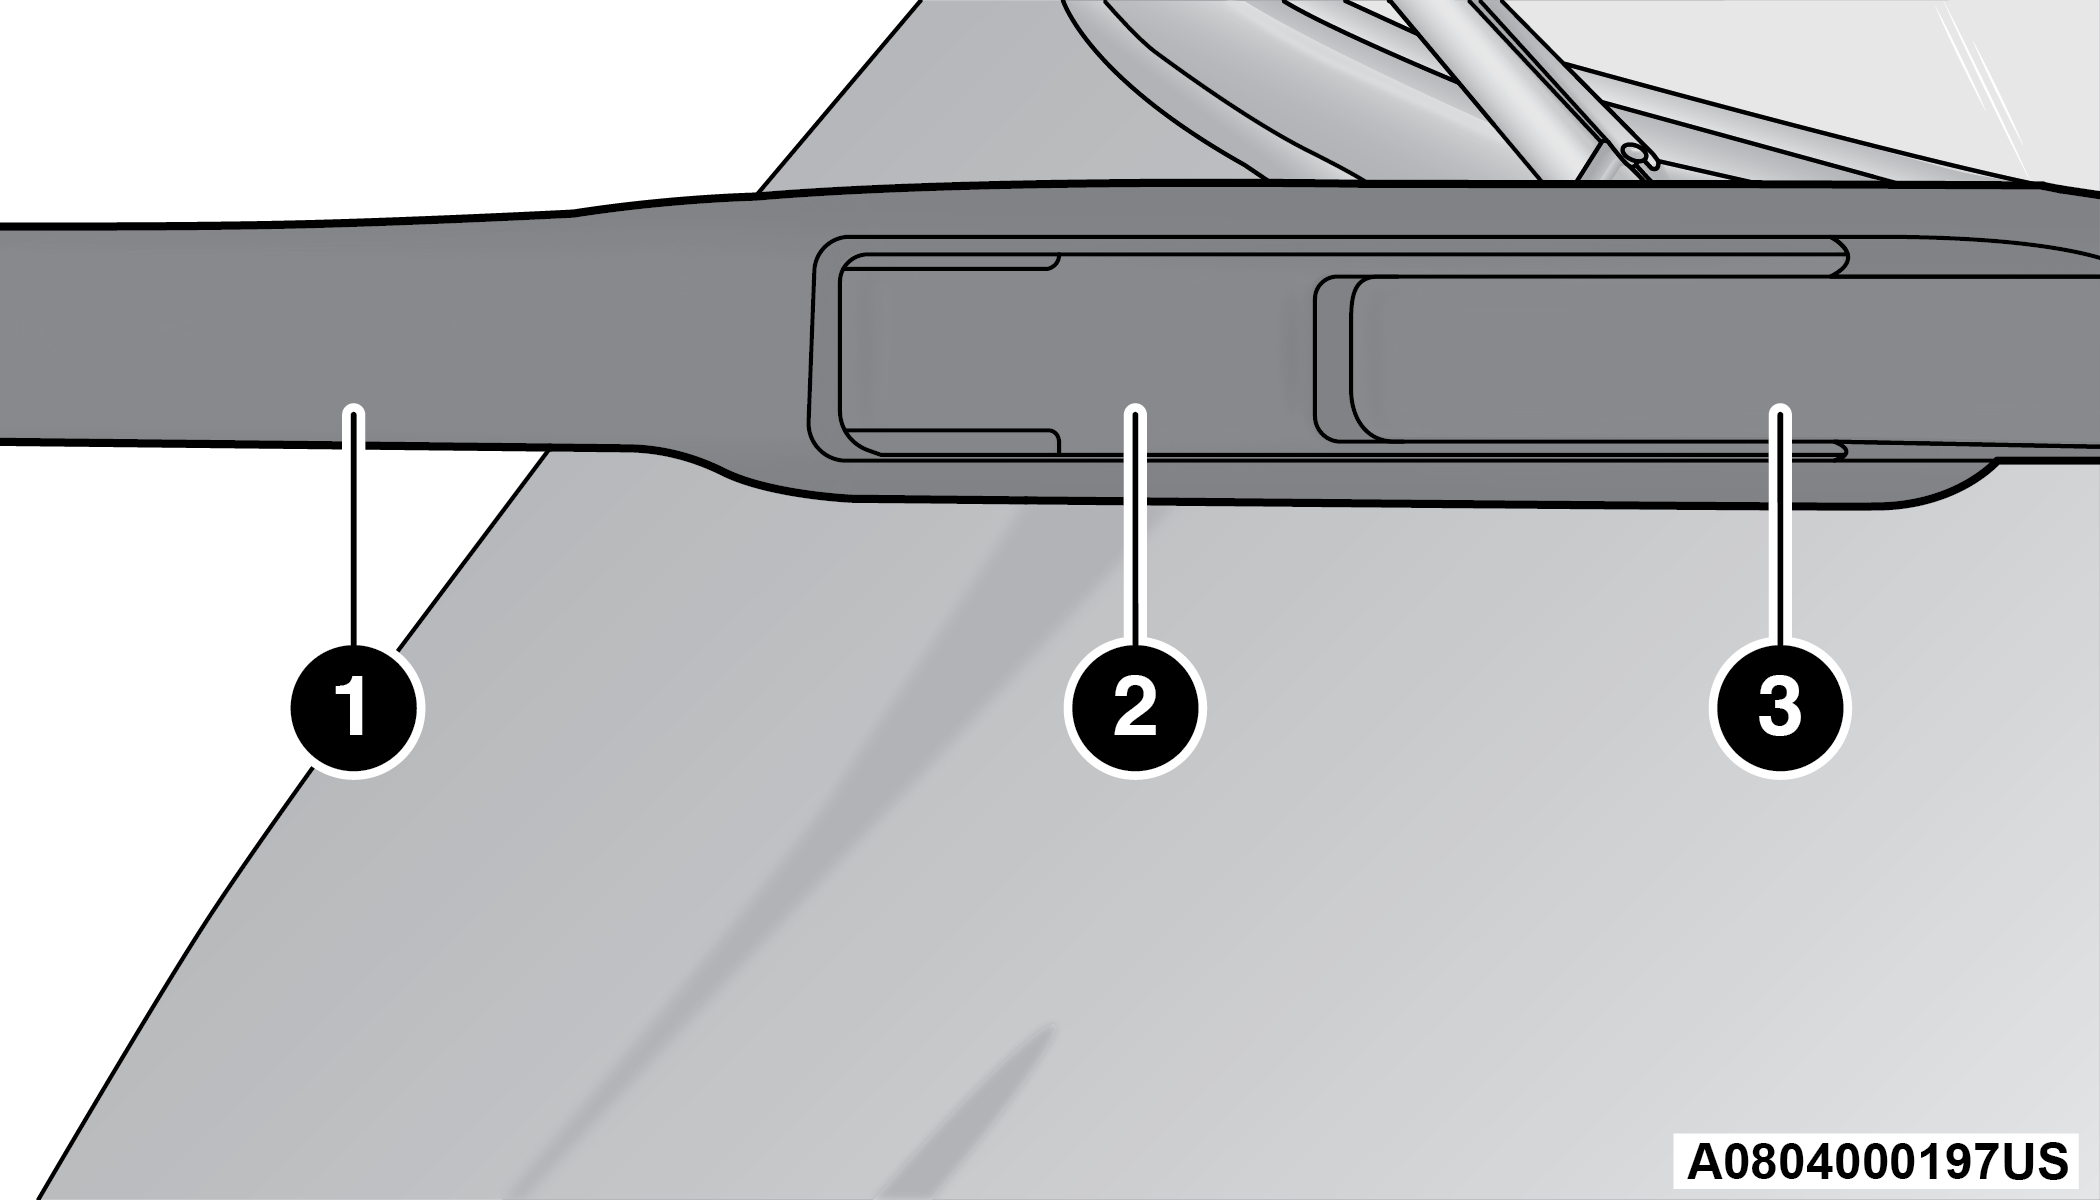
Wiper Blade With Release Tab In Locked Position
1 — Wiper
2 — Release Tab
3 — Wiper Arm
-
To disengage the wiper blade from the wiper arm, flip up the release tab on the wiper blade and while holding the wiper arm with one hand, slide the wiper blade down towards the base of the wiper arm.
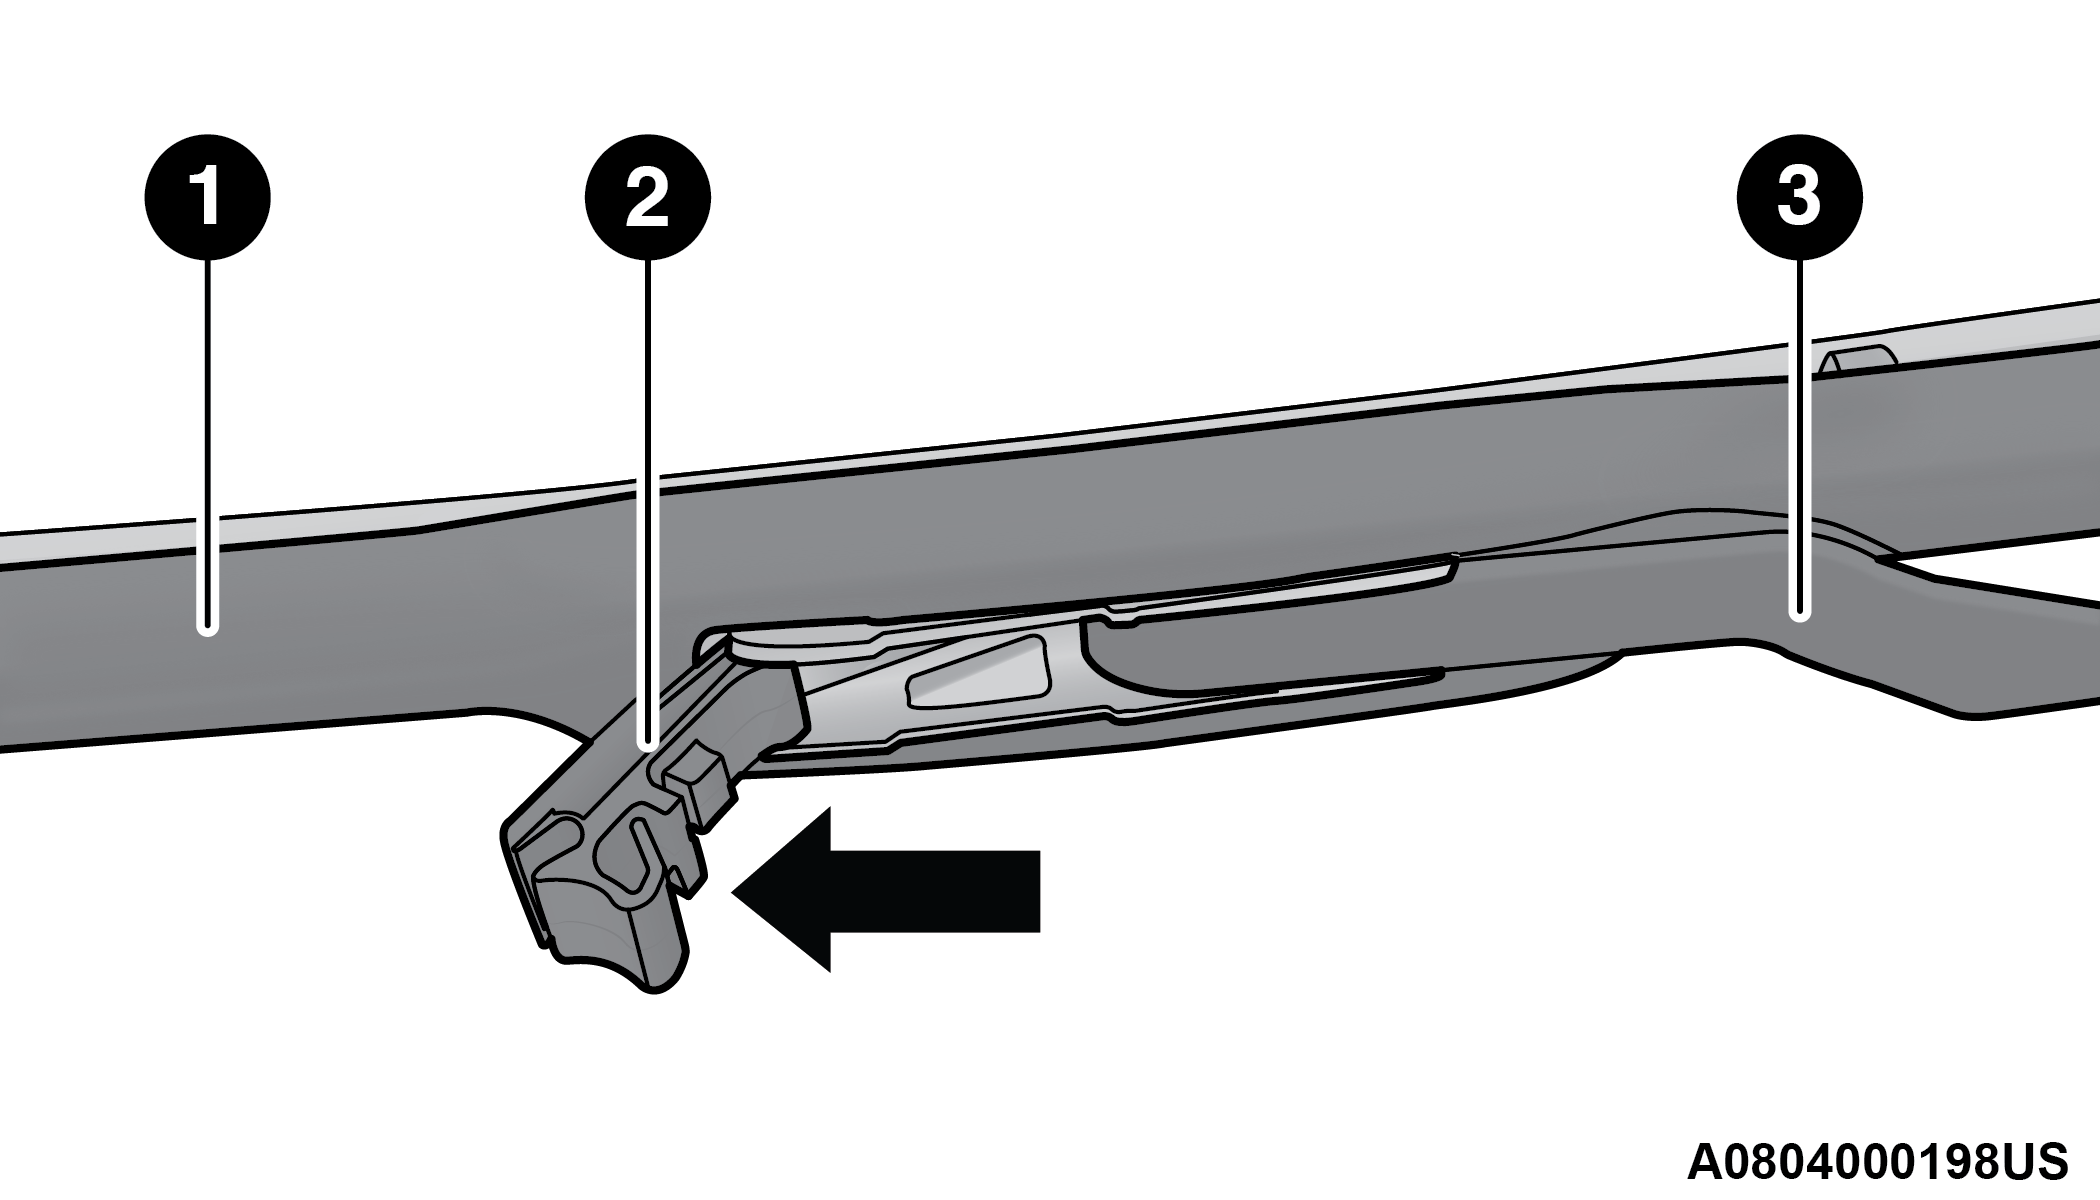
Wiper Blade With Release Tab In Unlocked Position
1 — Wiper Blade
2 — Release Tab
3 — Wiper Arm
-
With the wiper blade disengaged, remove the wiper blade from the wiper arm by holding the wiper arm with one hand and separating the wiper blade from the wiper arm with the other hand (move the wiper blade toward the right side of the vehicle to separate the wiper blade from the wiper arm).
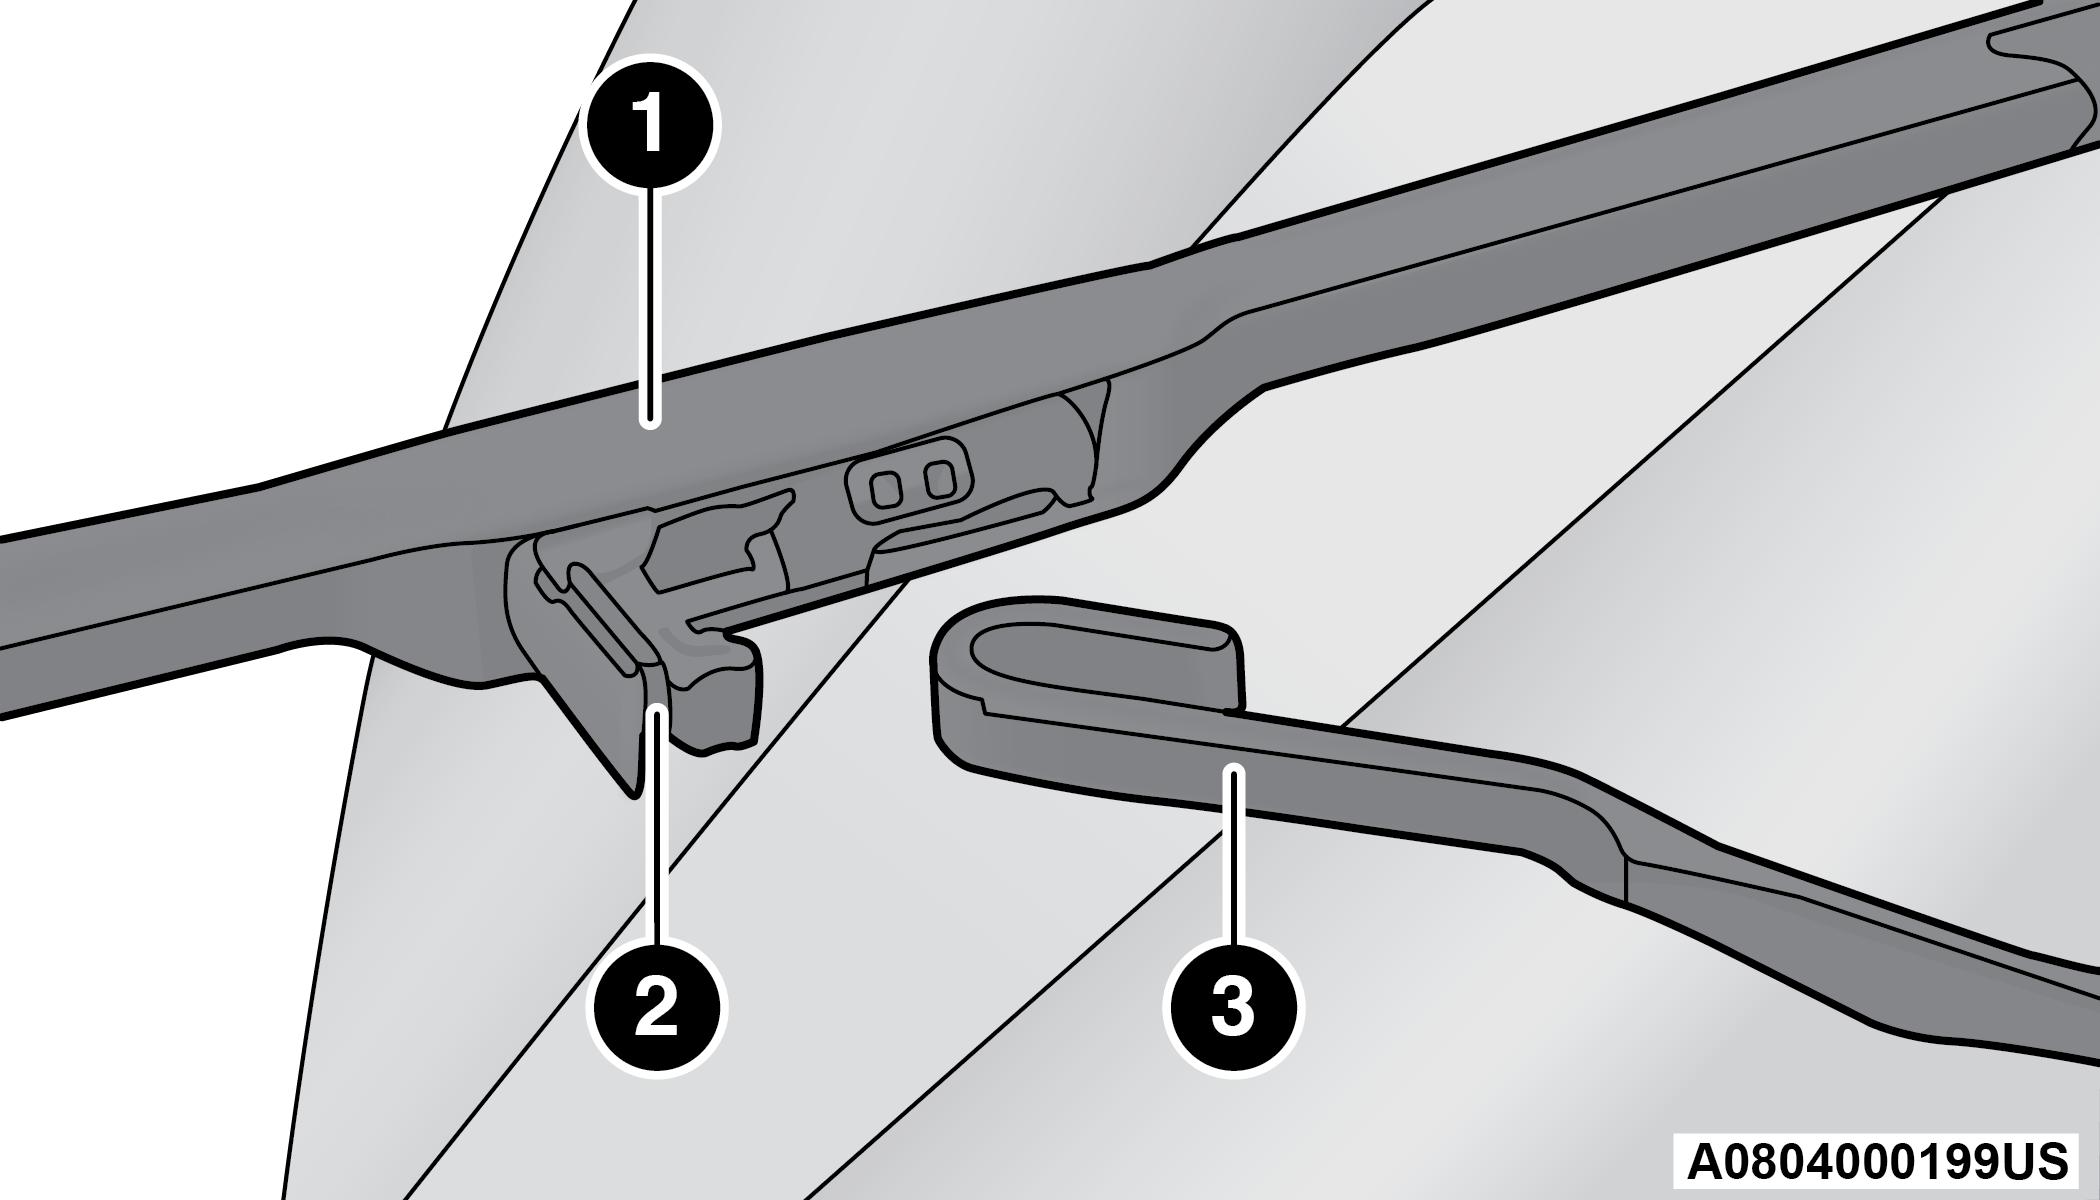
Wiper Blade Removed From Wiper Arm
1 — Wiper Blade
2 — Release Tab
3 — Wiper Arm
-
Gently lower the wiper arm onto the glass.
Installing The Front Wipers
-
Lift the wiper arm off of the glass, until the wiper arm is in the full up position.
-
Position the wiper blade near the hook on the tip of the wiper arm with the wiper release tab open and the blade side of the wiper facing up and away from the windshield.
-
Insert the hook on the tip of the arm through the opening in the wiper blade under the release tab.
-
Slide the wiper blade up into the hook on the wiper arm and rotate the wiper blade until it is flush against the wiper arm. Fold down the latch release tab and snap it into its locked position. Latch engagement will be accompanied by an audible click.
-
Gently lower the wiper blade onto the glass.
REAR WIPER BLADE REMOVAL/INSTALLATION
-
Lift the rear wiper arm fully off the glass.
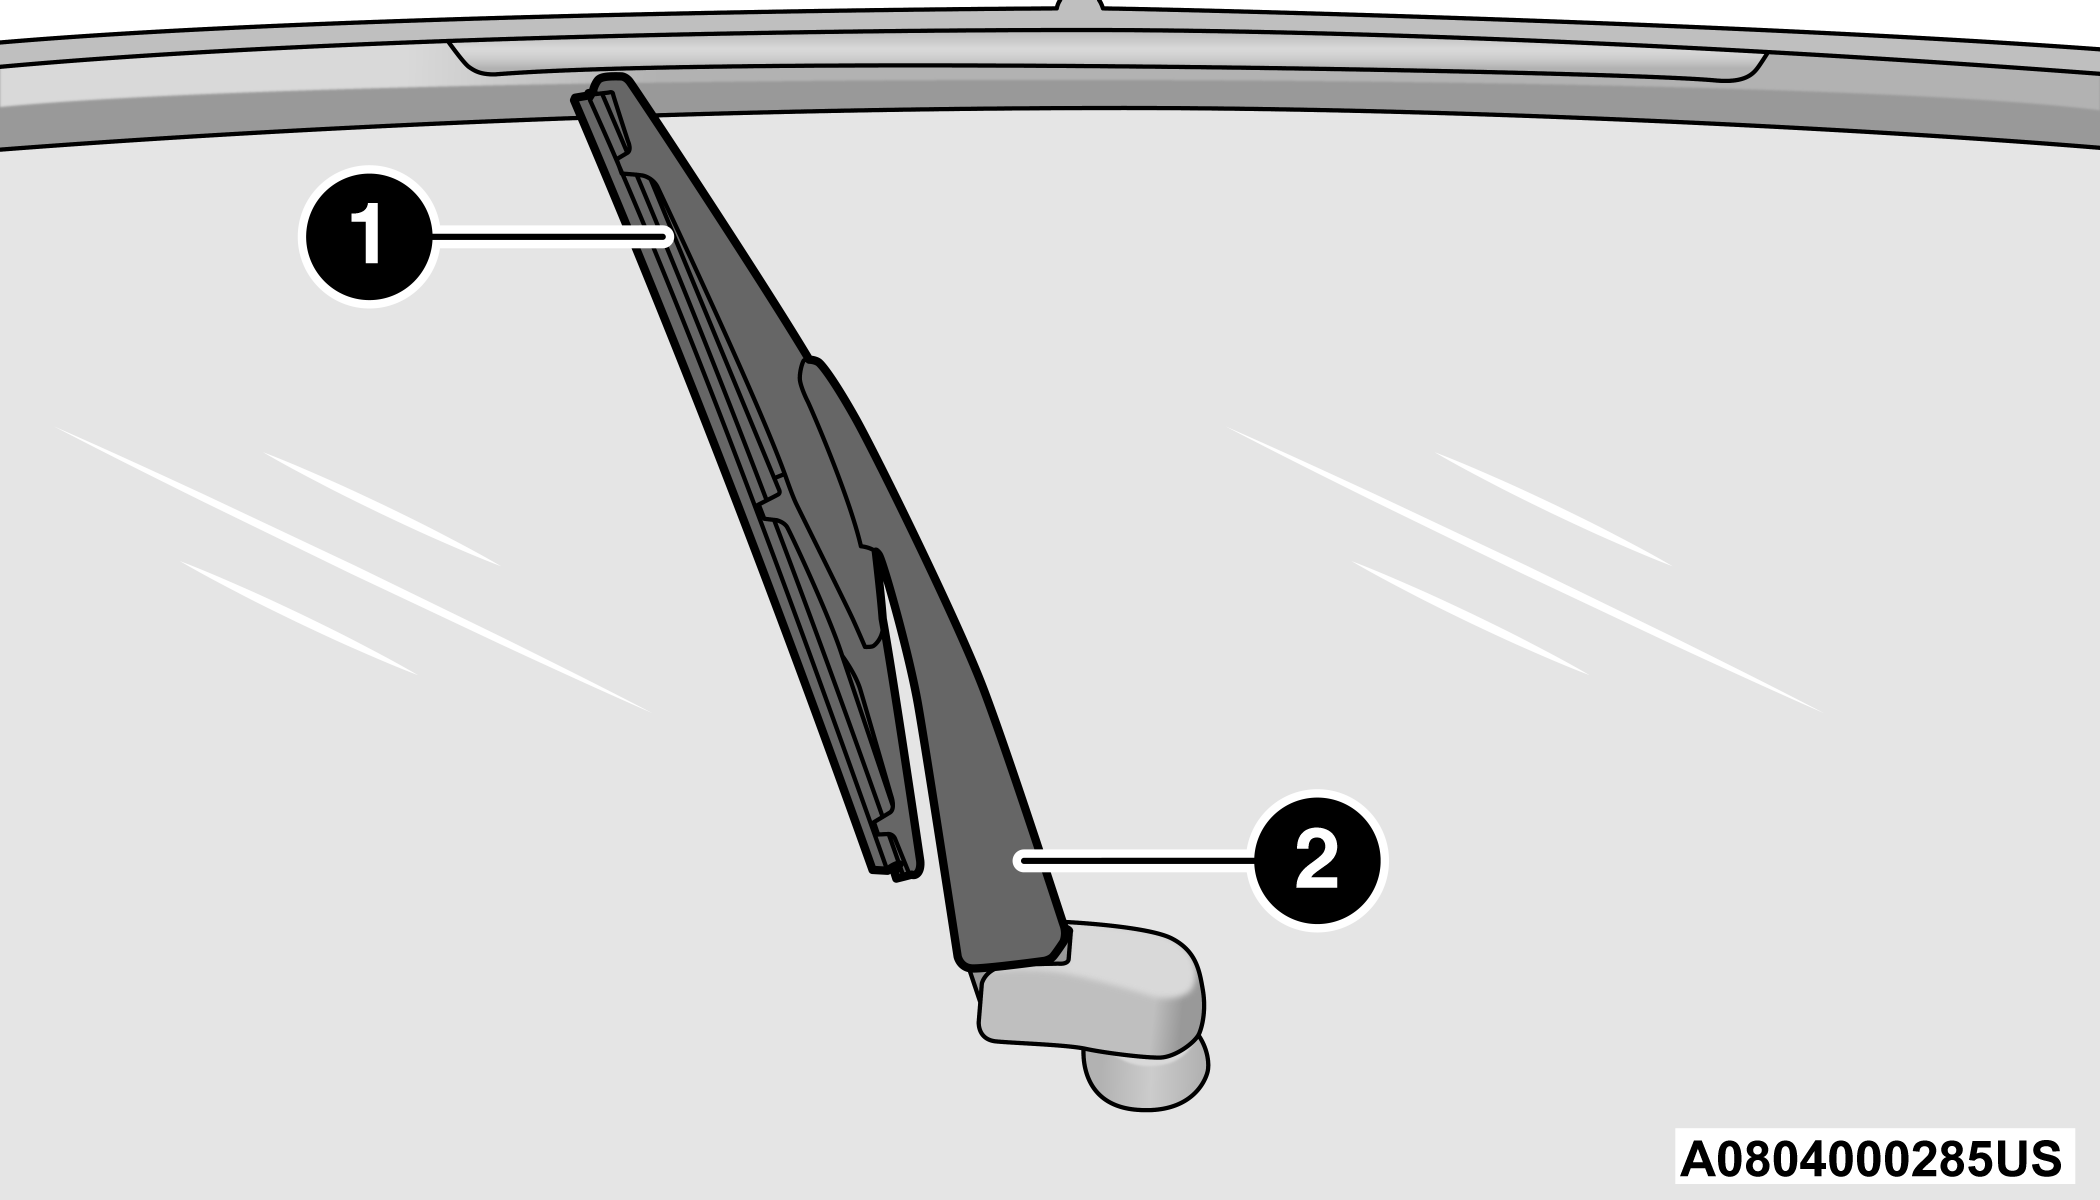
Wiper Blade In Folded Out Position
1 — Wiper Blade
2 — Wiper Arm
-
To remove the wiper blade from the wiper arm, grab the bottom end of the wiper blade nearest to wiper arm with your left hand. With your right hand, hold the wiper arm as you pull the wiper blade away from the wiper arm past its stop (far enough to unsnap the wiper blade pivot from the receptacle on the end of the wiper arm).
Note:
-
Resistance will be accompanied by an audible snap.
-
The wiper arm does not stay in the service up position.
-
-
Still grabbing the bottom end of the wiper blade, move the wiper blade upward and away from the wiper arm to disengage.
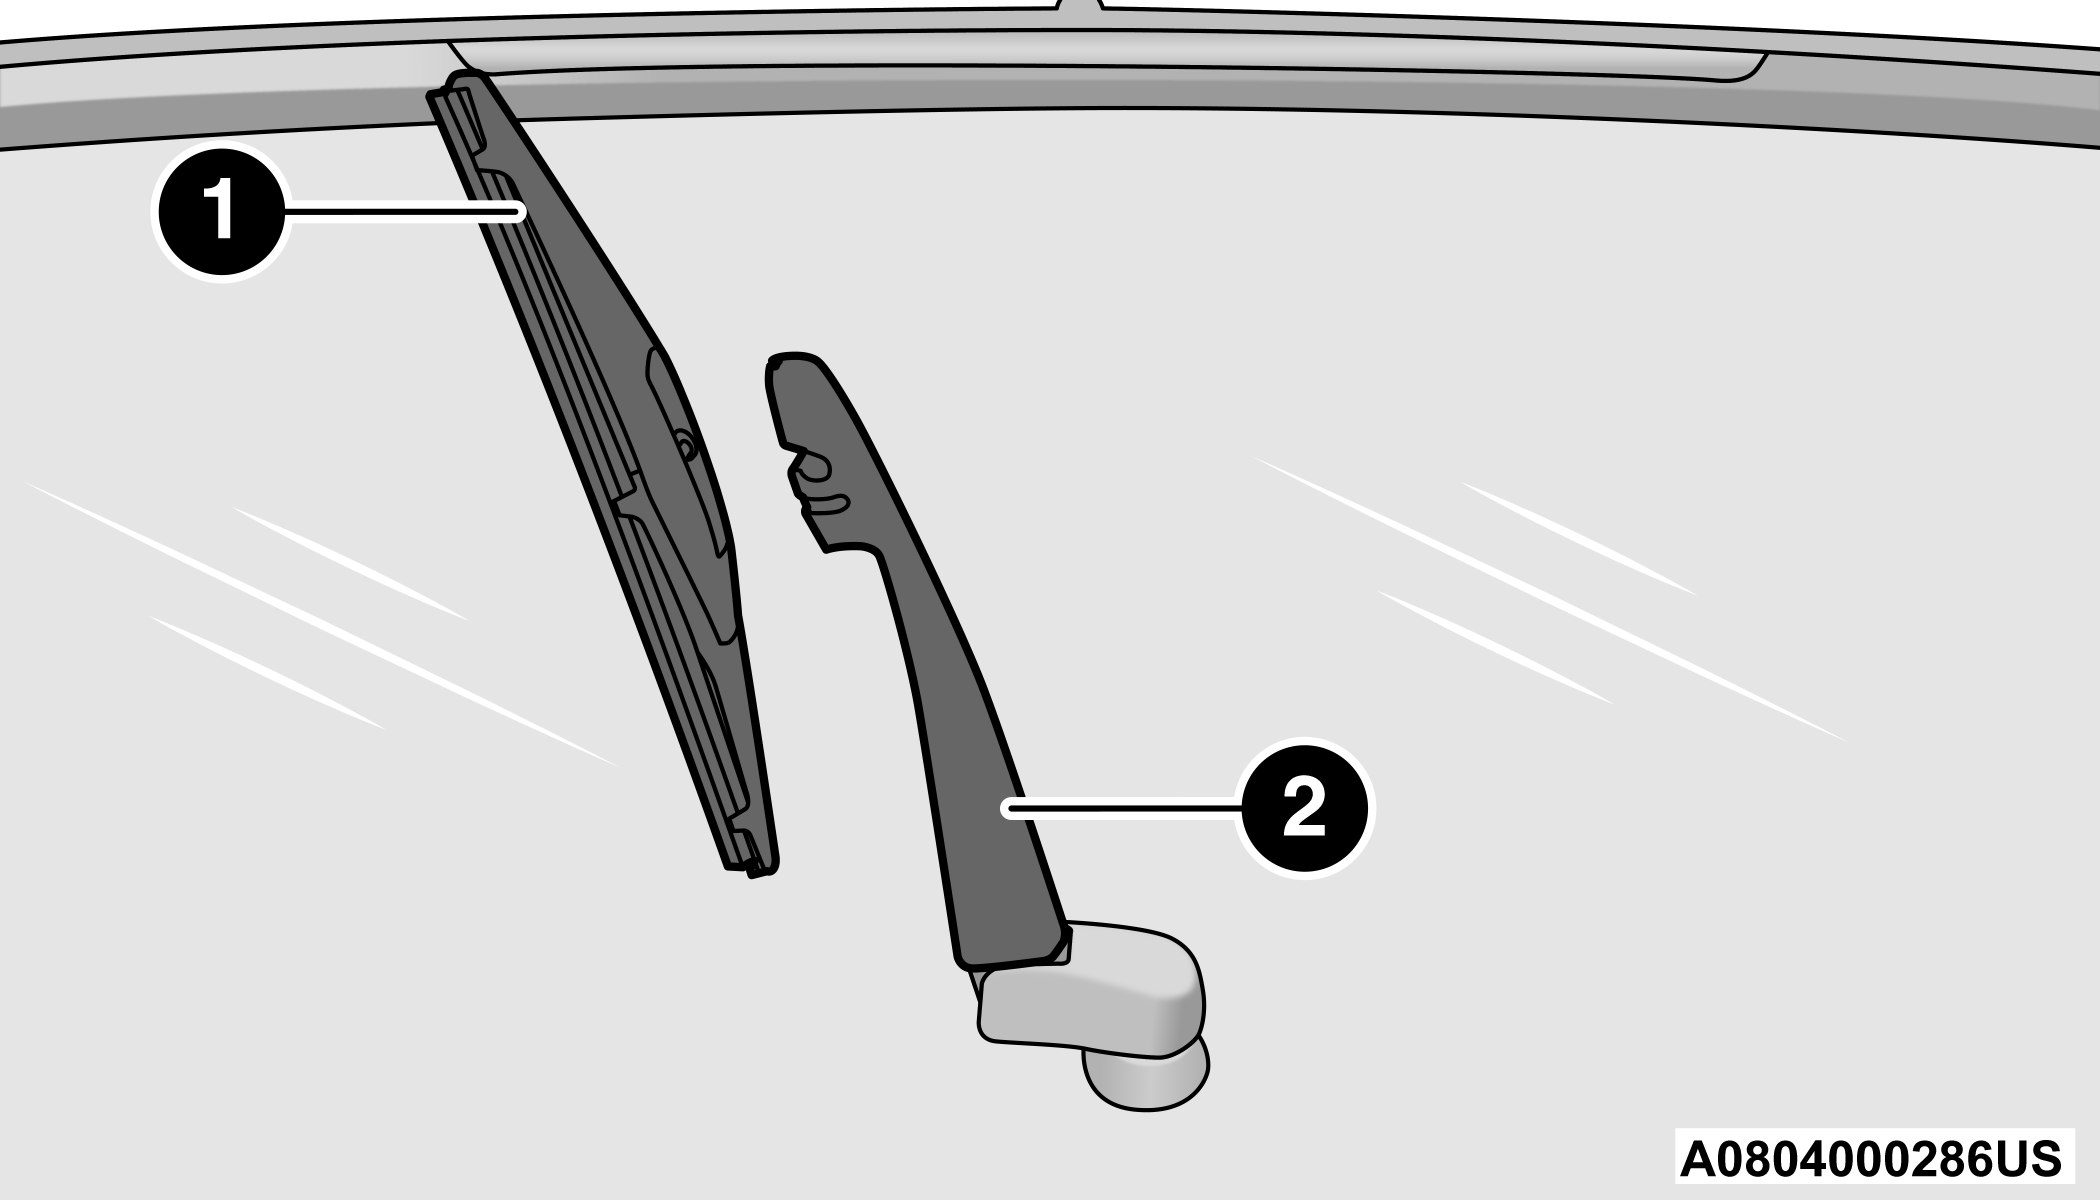
Wiper Blade Removed From Wiper Arm
1 — Wiper Blade
2 — Wiper Arm
-
Gently lower the tip of the wiper arm onto the glass.
Installing The Rear Wiper
-
Lift the rear wiper arm fully off the glass.
-
Insert the wiper blade pivot pin into the opening on the end of the wiper arm. Grab the bottom end of the wiper arm with one hand, and press the wiper blade flush with the wiper arm until it snaps into place.
-
Lower the wiper blade onto the glass.
EXHAUST SYSTEM
The best protection against carbon monoxide entry into the vehicle body is a properly maintained engine exhaust system.
If you notice a change in the sound of the exhaust system; or if the exhaust fumes can be detected inside the vehicle; or when the underside or rear of the vehicle is damaged; have an authorized technician inspect the complete exhaust system and adjacent body areas for broken, damaged, deteriorated, or mispositioned parts. Open seams or loose connections could permit exhaust fumes to seep into the passenger compartment. In addition, have the exhaust system inspected each time the vehicle is raised for lubrication or oil change. Replace as required.
WARNING:
Exhaust gases can injure or kill. They contain carbon monoxide (CO), which is colorless and odorless. Breathing it can make you unconscious and can eventually poison you. To avoid breathing CO .
A hot exhaust system can start a fire if you park over materials that can burn. Such materials might be grass or leaves coming into contact with your exhaust system. Do not park or operate your vehicle in areas where your exhaust system can contact anything that can burn.
CAUTION:
The catalytic converter requires the use of unleaded fuel only. Leaded gasoline will destroy the effectiveness of the catalyst as an emissions control device and may seriously reduce engine performance and cause serious damage to the engine.
Damage to the catalytic converter can result if your vehicle is not kept in proper operating condition. In the event of engine malfunction, particularly involving engine misfire or other apparent loss of performance, have your vehicle serviced promptly. Continued operation of your vehicle with a severe malfunction could cause the converter to overheat, resulting in possible damage to the converter and vehicle.
Under normal operating conditions, the catalytic converter will not require maintenance. However, it is important to keep the engine properly tuned to ensure proper catalyst operation and prevent possible catalyst damage.
Note:
Intentional tampering with emissions control systems can result in civil penalties being assessed against you.
In unusual situations involving grossly malfunctioning engine operation, a scorching odor may suggest severe and abnormal catalyst overheating. If this occurs, stop the vehicle, turn off the engine and allow it to cool. Service, including a tune-up to manufacturer's specifications, should be obtained immediately.
To minimize the possibility of catalytic converter damage:
Do not interrupt the ignition when the transmission is in gear and the vehicle is in motion.
Do not try to start the vehicle by pushing or towing the vehicle.
Do not idle the engine with any ignition components disconnected or removed, such as when diagnostic testing, or for prolonged periods during very rough idle or malfunctioning operating conditions.
COOLING SYSTEM
WARNING:
You or others can be badly burned by hot engine coolant (antifreeze) or steam from your radiator. If you see or hear steam coming from under the hood, do not open the hood until the radiator has had time to cool. Never open a cooling system pressure cap when the radiator or coolant bottle is hot.
Keep hands, tools, clothing, and jewelry away from the radiator cooling fan when the hood is raised. The fan starts automatically and may start at any time, whether the engine is running or not.
When working near the radiator cooling fan, disconnect the fan motor lead or turn the ignition to the OFF position. The fan is temperature controlled and can start at any time the ignition is in the ON position.
ENGINE COOLANT CHECKS
Check the engine coolant (antifreeze) protection every 12 months (before the onset of freezing weather, where applicable). If the engine coolant is dirty, the system should be drained, flushed, and refilled with fresh Organic Additive Technology (OAT) coolant (conforming to MS.90032) by an authorized dealer. Check the front of the A/C condenser for any accumulation of bugs, leaves, etc. If dirty, clean by gently spraying water from a garden hose vertically down the face of the condenser.
Check the engine cooling system hoses for brittle rubber, cracking, tears, cuts, and tightness of the connection at the coolant recovery bottle and radiator. Inspect the entire system for leaks. DO NOT REMOVE THE COOLANT PRESSURE CAP WHEN THE COOLING SYSTEM IS HOT.
COOLING SYSTEM — DRAIN, FLUSH AND REFILL
Note:
Some vehicles require special tools to add coolant properly. Failure to fill these systems properly could lead to severe internal engine damage. If any coolant is needed to be added to the system please contact an authorized dealer.
If the engine coolant (antifreeze) is dirty or contains visible sediment, have an authorized dealer clean and flush with Organic Additive Technology (OAT) coolant (conforming to MS.90032).
For the proper maintenance intervals .
SELECTION OF COOLANT
Refer to Engine Fluids And Lubricants .
Note:
Mixing of engine coolant (antifreeze) other than specified Organic Additive Technology (OAT) engine coolant, may result in engine damage and may decrease corrosion protection. OAT engine coolant is different and should not be mixed with Hybrid Organic Additive Technology (HOAT) engine coolant or any “globally compatible” coolant. If a non-OAT engine coolant is introduced into the cooling system in an emergency, the cooling system will need to be drained, flushed, and refilled with fresh OAT coolant (conforming to MS.90032), by an authorized dealer as soon as possible.
Do not use water alone or alcohol-based engine coolant products. Do not use additional rust inhibitors or antirust products, as they may not be compatible with the radiator engine coolant and may plug the radiator.
This vehicle has not been designed for use with propylene glycol-based engine coolant. Use of propylene glycol-based engine coolant is not recommended.
Some vehicles require special tools to add coolant properly. Failure to fill these systems properly could lead to severe internal engine damage. If any coolant is needed to be added to the system please contact an authorized dealer.
ADDING COOLANT
Your vehicle has been built with an improved engine coolant (OAT coolant conforming to MS.90032) that allows extended maintenance intervals. This engine coolant (antifreeze) can be used up to 10 years or 150,000 miles (240,000 km) before replacement. To prevent reducing this extended maintenance period, it is important to use the same engine coolant (OAT coolant conforming to MS.90032) throughout the life of your vehicle.
Please review these recommendations for using Organic Additive Technology (OAT) engine coolant that meets the requirements of the manufacturer Material Standard MS.90032. When adding engine coolant:
We recommend using Mopar® Antifreeze/Coolant 10 Year/150,000 Mile (240,000 km) Formula OAT that meets the requirements of the manufacturer Material Standard MS.90032.
Mix a minimum solution of 50% OAT engine coolant that meets the requirements of the manufacturer Material Standard MS.90032 and distilled water. Use higher concentrations (not to exceed 70%) if temperatures below −34°F (−37°C) are anticipated. Please contact an authorized dealer for assistance.
Use only high purity water such as distilled or deionized water when mixing the water/engine coolant solution. The use of lower quality water will reduce the amount of corrosion protection in the engine cooling system.
Note:
It is the owner's responsibility to maintain the proper level of protection against freezing according to the temperatures occurring in the area where the vehicle is operated.
Use care when filling under hood fluids such as engine oil, washer fluid, antifreeze, etc., to minimize spillage onto the top of the engine. Any excess fluid that is spilled onto the top of the engine should be removed using compressed air or an absorbent cloth.
Some vehicles require special tools to add coolant properly. Failure to fill these systems properly could lead to severe internal engine damage. If any coolant is needed to be added to the system, please contact a local authorized dealer.
Mixing engine coolant types is not recommended and can result in cooling system damage. If HOAT and OAT coolant are mixed in an emergency, have an authorized dealer drain, flush, and refill with OAT coolant (conforming to MS.90032) as soon as possible.
COOLING SYSTEM PRESSURE CAP
The cap must be fully tightened to prevent loss of engine coolant (antifreeze), and to ensure that engine coolant will return to the radiator from the coolant expansion bottle/recovery tank (if equipped).
The cap should be inspected and cleaned if there is any accumulation of foreign material on the sealing surfaces.
WARNING:
Do not open a hot engine cooling system. Never add engine coolant (antifreeze) when the engine is overheated. Do not loosen or remove the cap to cool an overheated engine. Heat causes pressure to build up in the cooling system. To prevent scalding or injury, do not remove the pressure cap while the system is hot or under pressure.
Do not use a pressure cap other than the one specified for your vehicle. Personal injury or engine damage may result.
DISPOSAL OF USED COOLANT
Used ethylene glycol-based coolant (antifreeze) is a regulated substance requiring proper disposal. Check with your local authorities to determine the disposal rules for your community. To prevent ingestion by animals or children, do not store ethylene glycol-based coolant in open containers or allow it to remain in puddles on the ground, clean up any ground spills immediately. If ingested by a child or pet, seek emergency assistance immediately.
COOLANT LEVEL
The coolant bottle provides a quick visual method for determining that the coolant level is adequate. With the engine off and cold, the level of the engine coolant (antifreeze) in the bottle should be between the ranges indicated on the bottle.
The radiator normally remains completely full, so there is no need to remove the radiator/coolant pressure cap unless checking for engine coolant freeze point or replacing coolant. Advise your service attendant of this. As long as the engine operating temperature is satisfactory, the coolant bottle need only be checked once a month.
When additional engine coolant is needed to maintain the proper level, only OAT coolant that meets the requirements of the manufacturer Material Standard MS.90032 should be added to the coolant bottle. Do not overfill.
ENGINE COOLANT LEVEL — 2.0L
WARNING:
Do not open a hot engine cooling system. Never add engine coolant (antifreeze) when the engine is overheated. Do not loosen or remove the cap to cool an overheated engine. Heat causes pressure to build up in the cooling system. To prevent scalding or injury, do not remove the pressure cap while the system is hot or under pressure.
Do not use a pressure cap other than the one specified for your vehicle. Personal injury or engine damage may result.
With the engine OFF and cold, the level of the engine coolant should be within the OK range between the ADD and FULL range on the dipstick.
-
Remove the cap with level dipstick from the engine coolant bottle.
-
Clean off the coolant from the dipstick.
-
Rest the cap on the opening of the coolant bottle without tightening the cap.
-
Remove the cap with dipstick and check the coolant level on the dipstick.
The radiator normally remains completely full, so there is no need to remove the radiator/coolant pressure cap unless checking for engine coolant freeze point or replacing coolant. Advise your service attendant of this. As long as the engine operating temperature is satisfactory, the coolant bottle need only be checked once a month.
When additional engine coolant is needed to maintain the proper level, only OAT coolant that meets the requirements of the manufacturer Material Standard MS.90032 should be added to the coolant bottle. Do not overfill.
COOLING SYSTEM NOTES
Note:
When the vehicle is stopped after a few miles/kilometers of operation, you may observe vapor coming from the front of the engine compartment. This is normally a result of moisture from rain, snow, or high humidity accumulating on the radiator and being vaporized when the thermostat opens, allowing hot engine coolant (antifreeze) to enter the radiator.
If an examination of your engine compartment shows no evidence of radiator or hose leaks, the vehicle may be safely driven. The vapor will soon dissipate.
Do not overfill the coolant expansion bottle.
Check the coolant freeze point in the radiator and in the coolant expansion bottle. If engine coolant needs to be added, the contents of the coolant expansion bottle must also be protected against freezing.
If frequent engine coolant additions are required, the cooling system should be pressure tested for leaks.
Maintain engine coolant concentration at a minimum of 50% OAT coolant (conforming to MS.90032) and distilled water for proper corrosion protection of your engine which contains aluminum components.
Make sure that the coolant expansion bottle overflow hoses are not kinked or obstructed.
Keep the front of the radiator clean. If your vehicle is equipped with air conditioning, keep the front of the condenser clean.
Do not change the thermostat for Summer or Winter operation. If replacement is ever necessary, install ONLY the correct type thermostat. Other designs may result in unsatisfactory engine cooling performance, poor gas mileage, and increased emissions.
BRAKE SYSTEM
In order to ensure brake system performance, all brake system components should be inspected periodically. For the proper maintenance intervals .
WARNING:
Riding the brakes can lead to brake failure and possibly a collision. Driving with your foot resting or riding on the brake pedal can result in abnormally high brake temperatures, excessive lining wear, and possible brake damage. You would not have your full braking capacity in an emergency.
FLUID LEVEL CHECK — BRAKE MASTER CYLINDER
The fluid level of the master cylinder should be checked whenever the vehicle is serviced, or immediately if the Brake System Warning Light is on. If necessary, add fluid to bring level within the designated marks on the side of the reservoir of the brake master cylinder. Be sure to clean the top of the master cylinder area before removing cap. With disc brakes, fluid level can be expected to fall as the brake pads wear. Brake fluid level should be checked when pads are replaced. If the brake fluid is abnormally low, check the system for leaks.
WARNING:
Use only manufacturer's recommended brake fluid . Using the wrong type of brake fluid can severely damage your brake system and/or impair its performance. The proper type of brake fluid for your vehicle is also identified on the original factory installed hydraulic master cylinder reservoir.
To avoid contamination from foreign matter or moisture, use only new brake fluid or fluid that has been in a tightly closed container. Keep the master cylinder reservoir cap secured at all times. Brake fluid in an open container absorbs moisture from the air resulting in a lower boiling point. This may cause it to boil unexpectedly during hard or prolonged braking, resulting in sudden brake failure. This could result in a collision.
Overfilling the brake fluid reservoir can result in spilling brake fluid on hot engine parts, causing the brake fluid to catch fire. Brake fluid can also damage painted and vinyl surfaces, care should be taken to avoid its contact with these surfaces.
Do not allow petroleum-based fluid to contaminate the brake fluid. Brake seal components could be damaged, causing partial or complete brake failure. This could result in a collision.
AUTOMATIC TRANSMISSION
SPECIAL ADDITIVES
The manufacturer strongly recommends against using any special additives in the transmission. Automatic Transmission Fluid (ATF) is an engineered product and its performance may be impaired by supplemental additives. Therefore, do not add any fluid additives to the transmission. Avoid using transmission sealers as they may adversely affect seals.
CAUTION:
Do not use chemical flushes in your transmission as the chemicals can damage your transmission components. Such damage is not covered by the New Vehicle Limited Warranty.
FLUID LEVEL CHECK
The fluid level is preset at the factory and does not require adjustment under normal operating conditions. Routine fluid level checks are not required; therefore the transmission has no dipstick. An authorized dealer can check your transmission fluid level using special service tools. If you notice fluid leakage or transmission malfunction, visit an authorized dealer immediately to have the transmission fluid level checked. Operating the vehicle with an improper fluid level can cause severe transmission damage.
CAUTION:
If a transmission fluid leak occurs, visit an authorized dealer immediately. Severe transmission damage may occur. An authorized dealer has the proper tools to adjust the fluid level accurately.
FLUID AND FILTER CHANGES
Under normal operating conditions, the fluid installed at the factory will provide satisfactory lubrication for the life of the vehicle.
Routine fluid and filter changes are not required. However, change the fluid and filter if the fluid becomes contaminated (with water, etc.), or if the transmission is disassembled for any reason.
SELECTION OF LUBRICANT
It is important to use the proper transmission fluid to ensure optimum transmission performance and life. Use only the manufacturer's specified transmission fluid . It is important to maintain the transmission fluid at the correct level using the recommended fluid.
Note:
No chemical flushes should be used in any transmission; only the approved lubricant should be used.
CAUTION:
Using a transmission fluid other than the manufacturer’s recommended fluid may cause deterioration in transmission shift quality and/or torque converter shudder.
FRONT/REAR AXLE FLUID
For normal service, periodic fluid level checks are not required. When the vehicle is serviced for other reasons the exterior surfaces of the axle assembly should be inspected. If gear oil leakage is suspected inspect the fluid level.
FRONT AXLE FLUID LEVEL CHECK
The front axle oil level needs to be no lower than 1/8 inch (3 mm) below the bottom of the fill hole.
The front axle fill and drain plugs should be tightened to 22 to 29 ft-lb (30 to 40 N·m).
CAUTION:
Do not overtighten the plugs as it could damage them and cause them to leak.
REAR AXLE FLUID LEVEL CHECK
The rear axle oil level needs to be no lower than 1/8 inch (3 mm) below the bottom of the fill hole.
The rear axle fill and drain plugs should be tightened to 22 to 29 ft-lb (30 to 40 N·m).
CAUTION:
Do not overtighten the plugs as it could damage them and cause them to leak.
SELECTION OF LUBRICANT
Use only the manufacturer's recommended fluid .
TRANSFER CASE
FLUID LEVEL CHECK
For normal service, periodic fluid level checks are not required. When the vehicle is serviced for other reasons the exterior surfaces of the transfer case assembly should be inspected. If oil leakage is suspected inspect the fluid level.
ADDING FLUID
Add fluid at the filler hole, until it runs out of the hole, when the vehicle is in a level position.
DRAIN
First remove fill plug, then remove drain plug. Recommended tightening torque for drain and fill plugs is 15 to 25 ft-lb (20 to 34 N·m).
CAUTION:
When installing plugs, do not overtighten. You could damage them and cause them to leak.
SELECTION OF LUBRICANT
Use only the manufacturer's recommended fluid .
FUSES
GENERAL INFORMATION
WARNING:
When replacing a blown fuse, always use an appropriate replacement fuse with the same amp rating as the original fuse. Never replace a fuse with another fuse of higher amp rating. The use of a fuse with a rating other than indicated may result in a dangerous electrical system overload. If a properly rated fuse continues to blow, it indicates a problem in the circuit that must be corrected. Never replace a blown fuse with metal wires or any other material. Do not place a fuse inside a circuit breaker cavity or vice versa. Failure to use proper fuses may result in serious personal injury, fire and/or property damage.
Before replacing a fuse, make sure that the ignition is off and that all the other services are switched off and/or disengaged.
If the replaced fuse blows again, contact an authorized dealer.
If a general protection fuse for safety systems (air bag system, braking system), power unit systems (engine system, transmission system) or steering system blows, contact an authorized dealer.
The fuses protect electrical systems against excessive current.
When a device does not work, you must check the fuse element inside the blade fuse for a break/melt.
Also, please be aware that using power outlets for extended periods of time with the engine off may result in vehicle battery discharge.
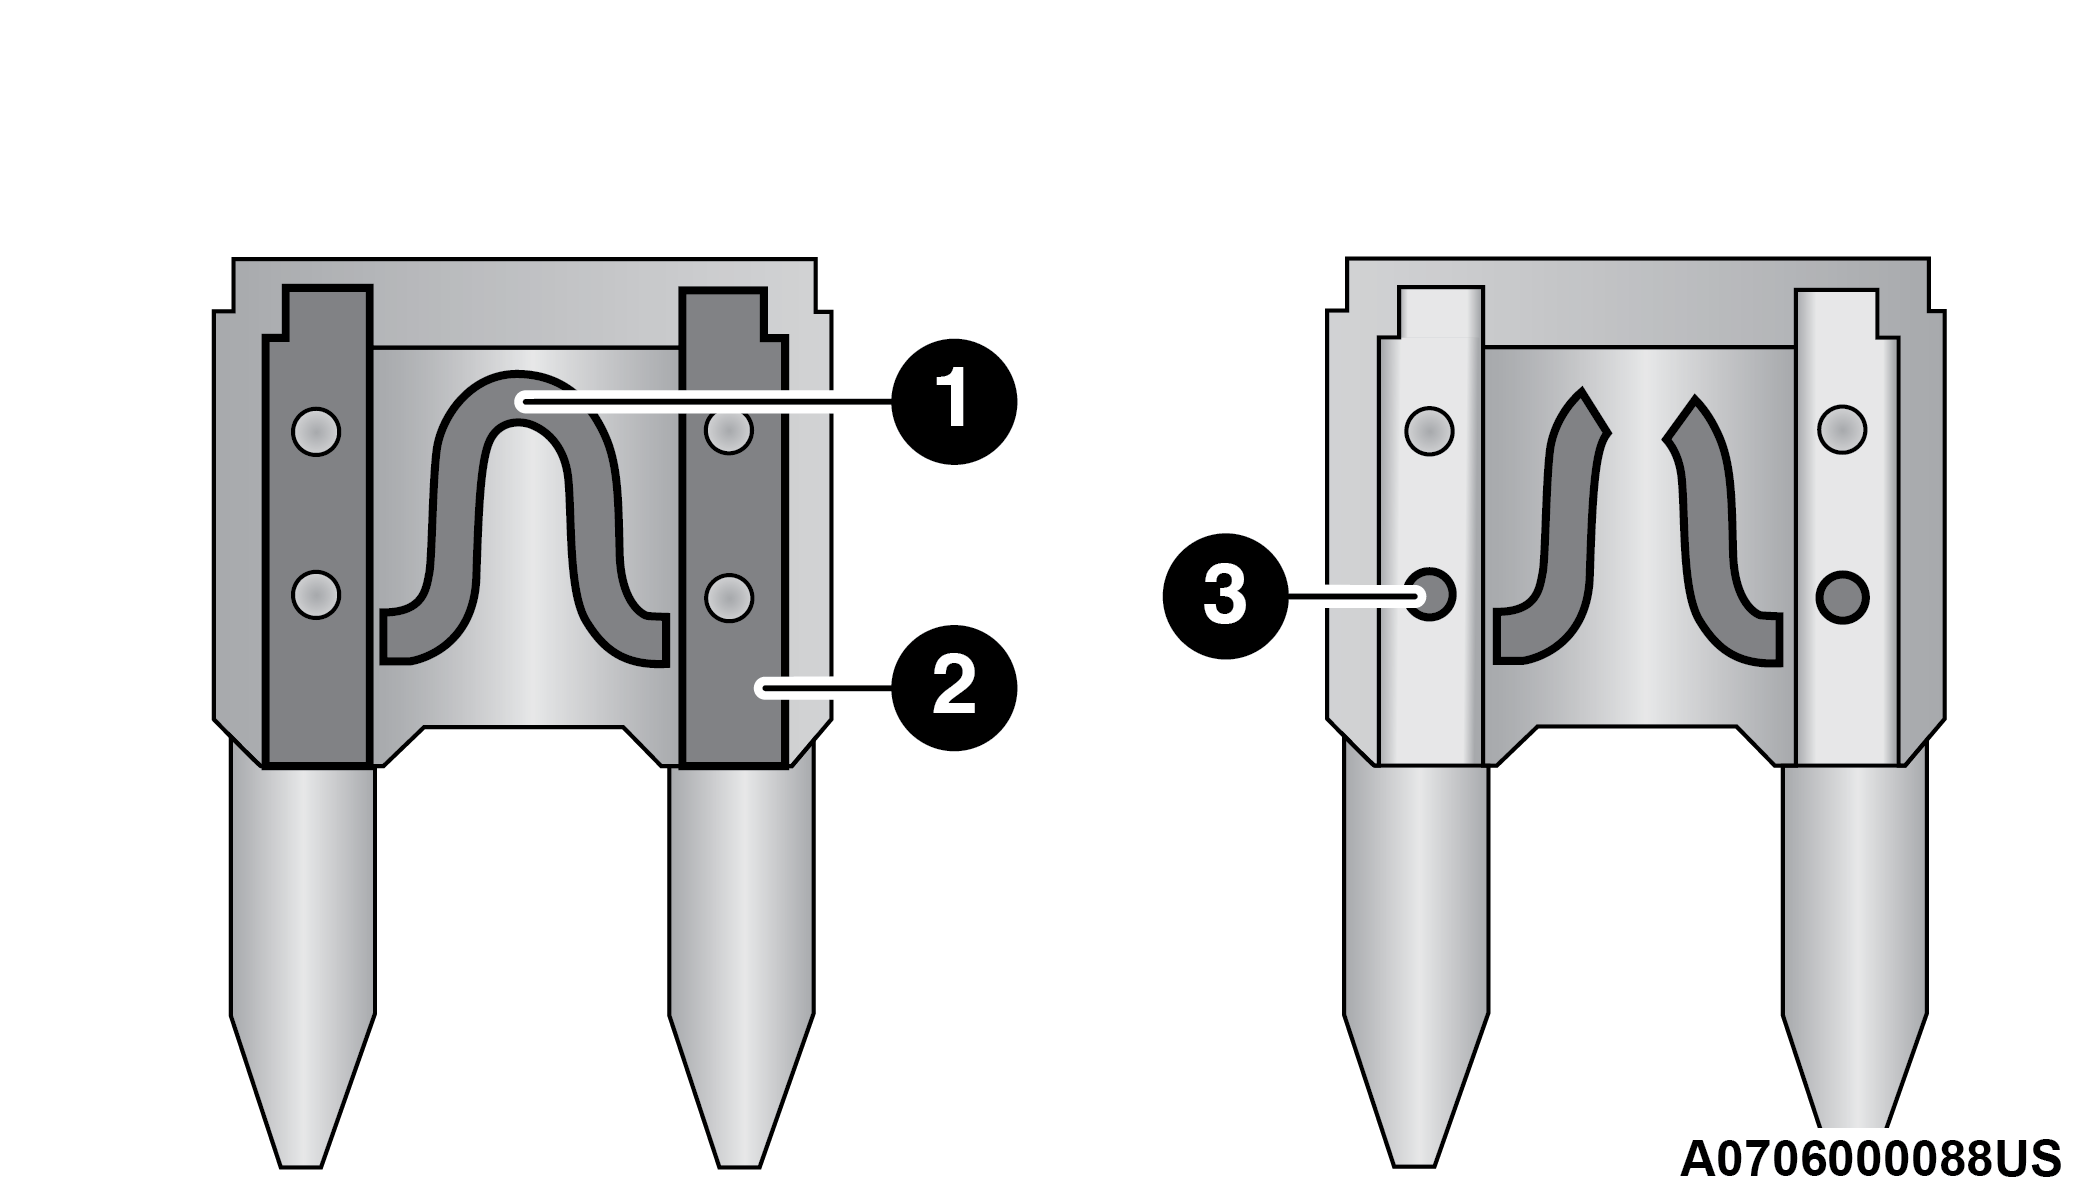
Blade Fuses
| 1 — Fuse Element |
| 2 — Blade Fuse with a good/functional fuse element |
| 3 — Blade fuse with a bad/not functional fuse element (blown fuse) |
CAUTION:
If it is necessary to wash the engine compartment, take care not to directly hit the fuse box, and the windshield wiper motor with water.
UNDERHOOD FUSES
The Power Distribution Center (PDC) is located on the passenger side of the engine compartment, behind the headlamp. This center contains cartridge fuses, micro fuses, relays, and circuit breakers. A description of each fuse and component may be stamped on the inside cover, otherwise the cavity number of each fuse is stamped on the inside cover that corresponds to the following chart.
CAUTION:
When installing the power distribution center cover, it is important to ensure the cover is properly positioned and fully latched. Failure to do so may allow water to get into the power distribution center and possibly result in an electrical system failure.
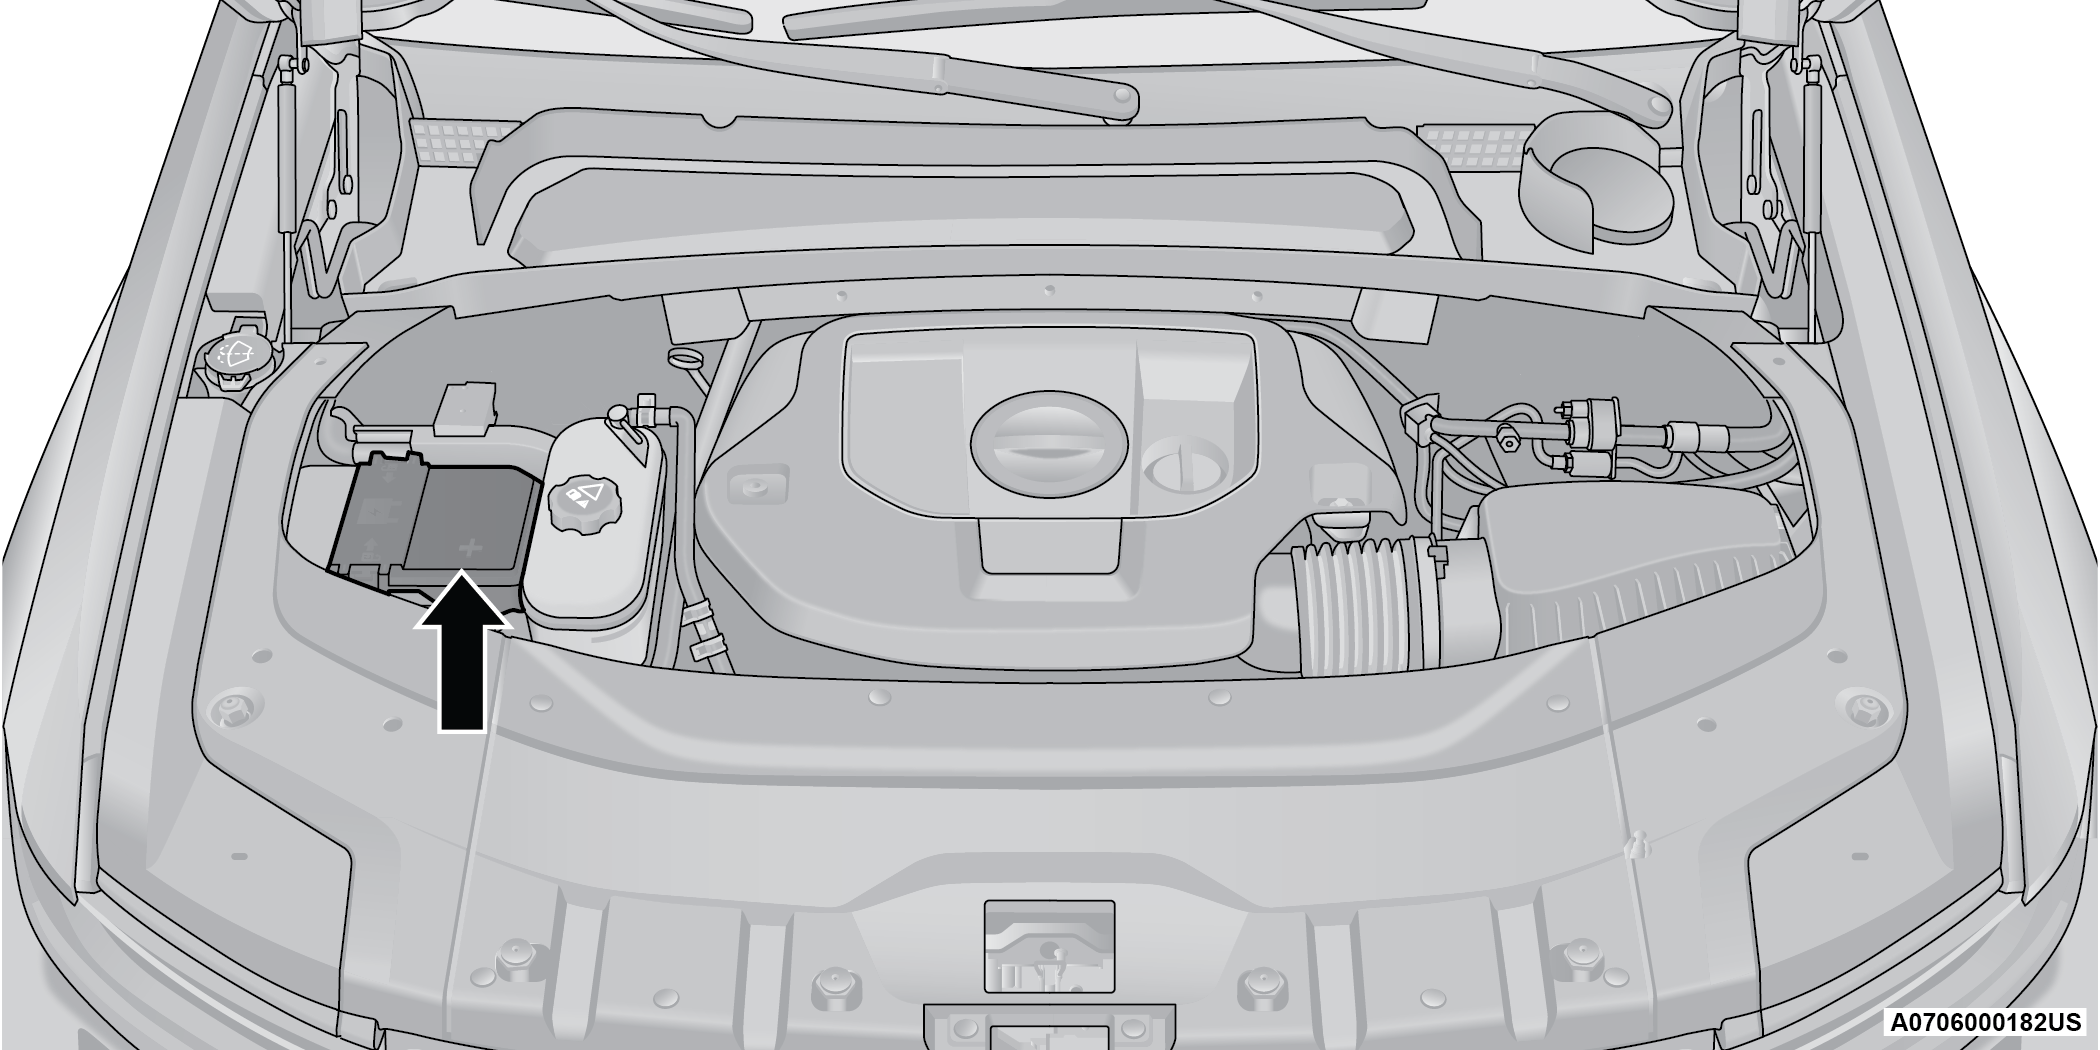
Power Distribution Center
Note:
Fuses for safety systems must be serviced by an authorized dealer.
|
Cavity |
Cartridge Fuse |
Micro Fuse |
Description |
|
* If Equipped |
|||
|
F01 |
– |
– |
Crank Batt |
|
F02 |
– |
– |
Spare |
|
F03 |
500 Amp Gray |
– |
Starter |
|
F04 |
250 Amp Gray |
– |
Alternator |
|
F05 |
– |
– |
Spare |
|
F06 |
– |
– |
Aux Battery Input |
|
F07 |
100 Amp Gray |
– |
Rad Fan |
|
F08 |
80 Amp Gray |
– |
Electrical Power Steering Module (EPS) #1 |
|
F09 |
80 Amp Gray |
– |
Electrical Power Steering Module (EPS) #2 |
|
F10 |
80 Amp Gray |
– |
Feed to IPDC |
|
F11 |
150 Amp Gray |
– |
PCR * |
|
F12 |
– |
– |
Not Populated |
|
F13 |
40 Amp Green |
– |
Starter |
|
F14 |
– |
10 Amp Red |
GNMM / VPMS* |
|
F15 |
– |
10 Amp Red |
ECM* |
|
F16 |
– |
15 Amp Blue |
Cluster |
|
F17A |
– |
10 Amp Red |
EPS |
|
F17B |
– |
– |
Not Populated |
|
F18 |
30 Amp Pink |
– |
Headlamp Washer |
|
F19 |
30 Amp Pink |
– |
BSM Valves #2* |
|
F20 |
– |
– |
Not Populated |
|
F21 |
– |
– |
Not Populated |
|
F22 |
– |
– |
Not Populated |
|
F23A |
– |
10 Amp Red |
ECM / EPS / PIM / SLM / GPF |
|
F23B |
– |
10 Amp Red |
AIR SUSPENSION / ELSD RR |
|
F24 |
– |
– |
Not Populated |
|
F25 |
– |
– |
Not Populated |
|
F26 |
50 Amp Red |
– |
BSM Motor #2* |
|
F27 |
30 Amp Pink |
– |
Rear Defroster (EBL) |
|
F28 |
– |
– |
Not Populated |
|
F29 |
– |
– |
Not Populated |
|
F30 |
– |
– |
Not Populated |
|
F31 |
– |
– |
Not Populated |
|
F32 |
– |
– |
Not Populated |
|
F33 |
– |
– |
Not Populated |
|
F34 |
– |
– |
Not Populated |
|
F35 |
– |
– |
Not Populated |
|
F36 |
50 Amp Red |
– |
BCM Feed #1 |
|
F37 |
30 Amp Pink |
– |
DTCM |
|
F38 |
– |
– |
Not Populated |
|
F39 |
– |
– |
Not Populated |
|
F40 |
– |
5 Amp Tan |
Battery Sensor #1 |
|
F41 |
– |
20 Amp Yellow |
CADM MAP* |
|
F42 |
– |
– |
Not Populated |
|
F43 |
– |
10 Amp Red |
Engine Control Module (ECM) |
|
F44 |
– |
– |
Not Populated |
|
F45 |
– |
15 Amp Blue |
Front Axle Disconnect |
|
F46 |
– |
– |
Not Populated |
|
F47 |
– |
– |
Not Populated |
|
F48 |
– |
10 Amp Red |
CVPAM |
|
F49 |
– |
– |
Not Populated |
|
F50 |
– |
– |
Not Populated |
|
F51 |
– |
20 Amp Yellow |
Fuel Pump |
|
F52 |
– |
– |
Not Populated |
|
F53 |
– |
– |
Not Populated |
|
F54 |
– |
20 Amp Yellow |
Headlamp LT |
|
F55 |
– |
15 Amp Blue |
BPCM * |
|
F56 |
– |
– |
Not Populated |
|
F57 |
– |
– |
Not Populated |
|
F58 |
– |
– |
Not Populated |
|
F59 |
– |
– |
Not Populated |
|
F60 |
– |
– |
Not Populated |
|
F61 |
– |
– |
Not Populated |
|
F62 |
– |
– |
Not Populated |
|
F63 |
– |
20 Amp Yellow |
Camera Washer Front |
|
F64 |
– |
15 Amp Blue |
Smart Bar Control Module |
|
F65 |
– |
15 Amp Blue |
ACT Grille Shutter / ACT Rear Axle Coolant Valve / Active Air Dam |
|
F66 |
– |
20 Amp Yellow |
Horns |
|
F67 |
– |
10 Amp Red |
DTCM / ASBS / Switchable Engine Mount / BSM #2 |
|
F68 |
– |
20 Amp Yellow |
Headlamp RT |
|
F69 |
– |
– |
Not Populated |
|
F70 |
– |
20 Amp Yellow |
IGN Coil / IGN Capacitors / Fuel Inj |
|
F71 |
– |
– |
Not Populated |
|
F72 |
– |
– |
Not Populated |
|
F73 |
– |
– |
Not Populated |
|
F74 |
– |
– |
Not Populated |
|
F75 |
– |
– |
Not Populated |
|
F76 |
– |
5 Amp Tan |
IDCM * |
|
F77 |
– |
20 Amp Yellow |
TCM SBW |
|
F78 |
– |
20 Amp Yellow |
ECM |
|
F79 |
– |
10 Amp Red |
Fuel Door / ELCM / Fuel Injectors * |
|
F80 |
20 Amp Blue |
– |
ECM |
|
F81 |
40 Amp Green |
– |
BCM Feed |
|
F82 |
– |
– |
Not Populated |
|
F83 |
40 Amp Green |
– |
LTR Coolant Pump* / Trans Oil Pump * |
|
F84 |
– |
– |
Not Populated |
|
F85 |
– |
10 Amp Red |
PCR |
|
F86 |
50 Amp Red |
– |
BSM Feed #1 - Valves |
|
F87 |
– |
– |
Not Populated |
|
F88 |
50 Amp Red |
– |
BSM Feed Motor #2 |
|
F89 |
– |
– |
Not Populated |
|
F90 |
– |
– |
Not Populated |
|
F91 |
– |
– |
Not Populated |
|
F92 |
20 Amp Blue |
– |
Front De-Icer |
|
F93 |
– |
– |
Not Populated |
|
F94 |
– |
10 Amp Red |
A/C Compressor Clutch |
|
F95 |
– |
10 Amp Red |
Batt Cool Heater * |
|
F96 |
– |
5 Amp Tan |
Elect Cool Heater * |
|
F97 |
– |
– |
Not Populated |
|
F98 |
– |
– |
Not Populated |
|
F99 |
– |
– |
Not Populated |
|
F100A |
– |
– |
Not Populated |
|
F100B |
– |
– |
Not Populated |
|
F101 |
– |
– |
Not Populated |
|
F102 |
– |
– |
Not Populated |
|
F103 |
30 Amp Pink |
– |
Frt Wiper |
|
F104A |
– |
15 Amp Blue |
PECP Low Temp Passive Pump * |
|
F104B |
– |
15 Amp Blue |
AHP High Temp Aux Pump * |
|
F105A |
– |
15 Amp Blue |
BCP Low Temp Active Pump * |
|
F105B |
– |
15 Amp Blue |
LTR Coolant Pump |
INTERIOR POWER DISTRIBUTION CENTER
The Interior Power Distribution Center is located underneath the steering column on the driver’s side of the vehicle. This center contains cartridge fuses, micro fuses, relays, and circuit breakers. Fuse numbers are labeled next to each fuse cavity, fuse descriptions correspond with the following chart.
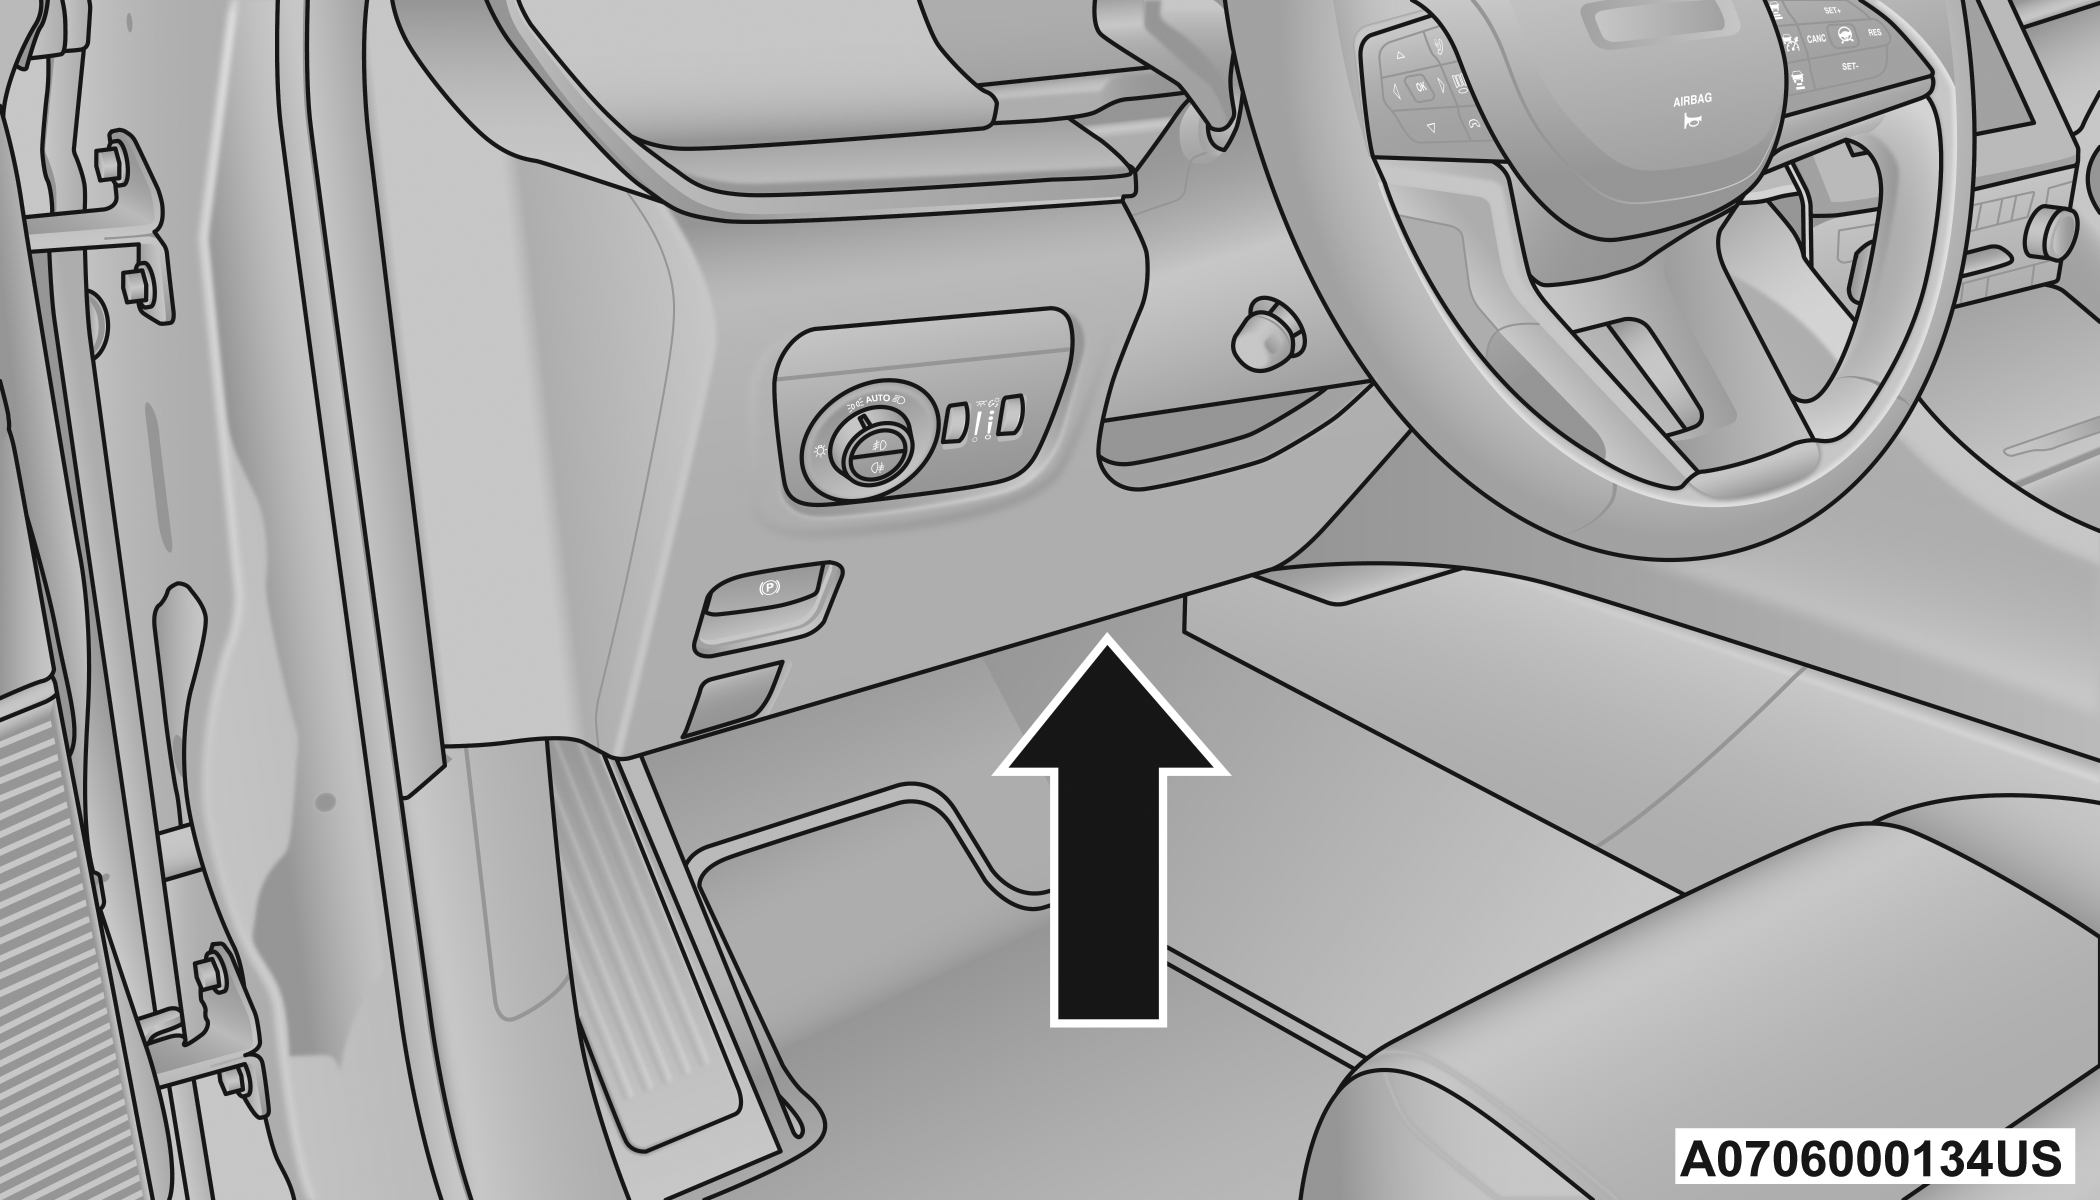
Interior PDC Location
Note:
Fuses for safety systems must be serviced by an authorized dealer.
|
Cavity |
Cartridge Fuse |
Micro Fuse |
Description |
| * If Equipped | |||
|
F01 |
– |
– |
Spare |
|
F02 |
25 Amp Clear |
– |
MTR Sunshade Sunroof Dual Pane / MTR sunroof single Pane |
|
F03 |
– |
15 Amp Blue |
MOD Seat Heater Frt (Steering Wheel)* |
|
F04 |
– |
10 Amp Red |
Night Vision Module / Driver Monitoring Camera (DMC) |
|
F05 |
– |
– |
Spare |
|
F06 |
– |
– |
Spare |
|
F07 |
– |
– |
Spare |
|
F08 |
– |
15 Amp Blue |
Automatic Gearbox Shifter Module (AGSM) / Steering Column Lock |
|
F09 |
– |
– |
Spare |
|
F10 |
40 Amp Green |
– |
HVAC Blower Motor |
|
F11 |
– |
– |
Spare |
|
F12 |
– |
20 Amp Yellow |
Assy Cigar Lighter |
|
F13 |
– |
10 Amp Red |
Assy Mirror Inside Rearview / Digital TV (DTV) - China - Japan / Sunroof Single - Dual Pane / Port UC1 Dual USB RR / Interior Monitoring Camera |
|
F14 |
– |
– |
Spare |
|
F15A |
– |
– |
Spare |
|
F15B |
– |
– |
Spare |
|
F16 |
– |
10 Amp Red |
MOD ORC |
|
F17 |
– |
– |
Spare |
|
F18 |
– |
– |
Spare |
|
F19 |
– |
– |
Spare |
|
F20 |
– |
10 Amp Red |
Overhead Console Assy (OHC) W/Sunshade / Intrusion Module / Intrusion Sensor / Siren / Heads Up Display (HUD) / Digital TV (DTV) China - Japan |
|
F21 |
30 Amp Pink |
– |
Trailer Tow Electric Brake - After market |
|
F22 |
– |
– |
Spare |
|
F23 |
– |
– |
Spare |
|
F24 |
– |
– |
Spare |
|
F25 |
– |
– |
Spare |
|
F26 |
– |
– |
Spare |
|
F27 |
– |
– |
Spare |
|
F28 |
– |
– |
Spare |
|
F29 |
– |
– |
Spare |
|
F30 |
– |
– |
Spare |
|
F31 |
– |
– |
Spare |
|
F32 |
– |
15 Amp Blue |
MOD ICS Switch Bank / SW Bank Upper / SW EPB / Aux Switch Bank Module (ASBM) |
|
F33 |
– |
15 Amp Blue |
Transfer case SW / Humidity Rain Light Sensor (HRLS) / Suspension SW* |
|
F34 |
– |
– |
Spare |
|
F35 |
– |
10 Amp Red |
IRCAM Heater |
|
F36 |
– |
– |
Spare |
|
F37 |
– |
– |
Spare |
|
F38 |
– |
– |
Spare |
|
F39 |
– |
– |
Spare |
|
F40 |
– |
– |
Spare |
|
F41A |
– |
10 Amp Red |
MOD Occupant Class / Steering Column Lock |
|
F41B |
– |
10 Amp Red |
Spare |
|
F42A |
– |
10 Amp Red |
Parktronics System MOD (PTS) / MOD Haptic Lane Feedback / Trailer Tow Module |
|
F42B |
– |
10 Amp Red |
MOD HVAC Control / Frt ERC Motor Ctrl / RR ERC Motor Ctrl |
|
F43A |
– |
– |
Spare |
|
F43B |
– |
– |
Spare |
|
F44 |
– |
15 Amp Blue |
MOD Cluster CCN / MOD SGW (Cybersecurity) |
|
F45 |
– |
– |
Spare |
|
F46 |
– |
– |
Spare |
|
F47A |
– |
– |
Spare |
|
F47B |
– |
– |
Spare |
|
F48A |
– |
– |
Spare |
|
F48B |
– |
– |
Spare |
|
F49 |
– |
7.5 Amp Brown |
MOD RF HUB / Module Ignition (MD KIN) |
|
F50A |
– |
10 Amp Red |
Telematics Box Module (TBM) / MOD Front Passenger Display Module (FPDM) / MOD DCSD* |
|
F50B |
– |
10 Amp Red |
Port Diagnostics 1 & 2 |
|
F51A |
– |
– |
Spare |
|
F51B |
– |
– |
Spare |
|
F52 |
– |
– |
Spare |
|
F53 |
– |
20 Amp Yellow |
MOD CMCM (Radio) |
|
F54A |
– |
– |
Spare |
|
F54B |
– |
– |
Spare |
|
F55 |
– |
– |
Spare |
|
F56 |
– |
– |
Spare |
|
F57 |
– |
– |
Spare |
|
F58 |
– |
– |
Spare |
|
F59 |
– |
– |
Spare |
|
F60 |
– |
– |
Spare |
|
F61 |
– |
– |
Spare |
|
F62A |
– |
– |
Spare |
|
F62B |
– |
– |
Spare |
|
F63A |
– |
15 Amp Blue |
Media HUB #1 Frt / Port UC1 Dual USB Frt / Wireless Charging Pad MOD (WCPM) - High/Premium Only |
|
F63B |
– |
15 Amp Blue |
Spare |
|
F64A |
– |
10 Amp Red |
MOD ORC |
|
F64B |
– |
10 Amp Red |
Steering Column Control Module (SCCM) |
|
F65 |
– |
5 Amp Tan |
MOD SGW (Cybersecurity) |
|
F66 |
– |
– |
Spare |
|
CB1 |
– |
– |
Spare |
|
CB2 |
– |
– |
Spare |
|
CB3 |
– |
– |
Spare |
|
CB4 |
– |
– |
Spare |
|
CB5 |
– |
– |
Spare |
|
CB6 |
– |
– |
Spare |
CAUTION:
When installing the power distribution center cover, it is important to ensure the cover is properly positioned and fully latched. Failure to do so may allow water to get into the power distribution center and possibly result in an electrical system failure.
REAR POWER DISTRIBUTION CENTER
The Rear Power Distribution Center is located underneath the passenger seat. This center contains cartridge fuses, micro fuses, relays, and circuit breakers. The following chart corresponds to the fuses inside.
Note:
Fuses for safety systems must be serviced by an authorized dealer.
|
Cavity |
Cartridge Fuse |
Micro Fuse |
Description |
|
* If Equipped |
|||
|
F03 |
Shunt |
– |
Auxiliary Battery Feed * |
|
F05 |
150 Amp Gray |
– |
Underhood PDC Feed * |
|
F06 |
– |
– |
Spare |
|
F07 |
– |
– |
Spare |
|
F08 |
– |
– |
Spare |
|
F09 |
– |
– |
Spare |
|
F10 |
– |
– |
Spare |
|
F11 |
50 Amp Red |
– |
Mod BCM Feed #2 |
|
F12 |
– |
– |
Spare |
|
F13 |
– |
– |
Spare |
|
F14 |
– |
– |
Spare |
|
F15A |
– |
– |
Spare |
|
F15B |
– |
10 Amp Red |
Hands Free Liftgate / Rear Window Switches / MOD HVAC Cntrl Frt |
|
F16 |
– |
– |
Spare |
|
F17 |
40 Amp Green |
– |
Mod BCM Feed #3 |
|
F18 |
30 Amp Pink |
– |
Power Liftgate Module |
|
F19A |
– |
10 Amp Red |
L2+ Driver Alert Lighting Module |
|
F19B |
– |
– |
Spare |
|
F20A |
– |
15 Amp Blue |
Central ADAS Decision Module (CADM) - LO |
|
F20B |
– |
– |
Spare |
|
F21A |
– |
– |
Spare |
|
F21B |
– |
– |
Spare |
|
F22 |
– |
– |
Spare |
|
F23 |
– |
10 Amp Red |
Media Hub #2 (RR) / #3 (LR) |
|
F24 |
– |
– |
Spare |
|
F25 |
30 Amp Pink |
– |
Mod Door MUX Passenger |
|
F26 |
20 Amp Blue |
– |
Headrest Dump 3rd Row (LT & RT)* |
|
F27 |
– |
– |
Spare |
|
F28 |
30 Amp Pink |
– |
MOD Memory / Power Seat (Passenger Frt) |
|
F29A |
– |
10 Amp Red |
MOD ICS Switch Bank Rear (Frt Console) |
|
F29B |
– |
– |
Spare |
|
F30 |
30 Amp Pink |
– |
MOD Memory / Power Seat (Driver Frt) |
|
F31 |
– |
– |
Spare |
|
F32 |
– |
– |
Spare |
|
F33 |
– |
– |
Spare |
|
F34 |
30 Amp Pink |
– |
MOD Door MUX Driver |
|
F35 |
25 Amp Clear |
– |
Trailer Tow Module #2 |
|
F36A |
– |
10 Amp Red |
Intelligent Event Base Lighting Module |
|
F36B |
– |
10 Amp Red |
Port Pwr USB Console (USB CH Only) / Port UCI Dual USB Rear |
|
F37 |
25 Amp Clear |
– |
Trailer Tow Module #1 |
|
F38 |
– |
– |
Spare |
|
F39 |
– |
– |
Spare |
|
F40 |
– |
30 Amp Green |
Mod Audio Amplifier #1A |
|
F41 |
– |
– |
Spare |
|
F42A |
– |
– |
Spare |
|
F42B |
– |
10 Amp Red |
Rear Entertainment Screens 1 (Res1) / (Res2) / Media Hub #2 RR Wake Up / Media Hub #3 Wake Up / APO Illumination / 2nd - 3rd Row Seat Switches-Illumination |
|
F43 |
– |
– |
Spare |
|
F44A |
– |
20 Amp Yellow |
12 Volt Power Outlet Cargo Area (Ign) |
|
F44B |
– |
20 Amp Yellow |
12 Volt Power Outlet Cargo Area (Battery) |
|
F45 |
– |
20 Amp Yellow |
MOD CRSM (Heated Seat RR RT) |
|
F46 |
30 Amp Pink |
– |
WL75 Folding Seat Module 3rd Row Feed #1* |
|
F47 |
– |
– |
Spare |
|
F48 |
– |
– |
Spare |
|
F49 |
– |
– |
Spare |
|
F50 |
– |
15 Amp Blue |
Seat Massage Driver Mod (SSMD) / Seat Massage Passenger Mod (SSMP)* |
|
F51 |
– |
30 Amp Green |
MOD IAir Suspension (Valves) |
|
F52 |
– |
20 Amp Yellow |
MOD CRSM (Heat Seat RR LT)* |
|
F53 |
30 Amp Pink |
– |
Electronic Limited Slip Differential (ELSD) Rear #1 |
|
F54 |
– |
– |
Spare |
|
F55 |
30 Amp Pink |
– |
MOD Inverter |
|
F56 |
30 Amp Pink |
– |
WL75 Folding Seat Module 3rd Row Feed #2* |
|
F57 |
– |
– |
Spare |
|
F58 |
– |
15 Amp Blue |
3rd Row Additional USB charge (Only LT - RT) / Port Pwr USB Console UBS (CH Only) |
|
F59 |
– |
– |
Spare |
|
F60 |
– |
– |
Spare |
|
F61 |
– |
– |
Spare |
|
F62 |
– |
20 Amp Yellow |
Module Seat Heater Frt (Driver)* |
|
F63 |
30 Amp Pink |
– |
Assy Trailer Tow Receptacle B+ |
|
F64 |
– |
– |
Spare |
|
F65 |
– |
– |
Spare |
|
F66 |
20 Amp Blue |
– |
MOD Door MUX Passenger Rear - Smart Motor |
|
F67 |
– |
30 Amp Green |
MOD Audio Amplifier #1B |
|
F68 |
– |
– |
Spare |
|
F69 |
– |
20 Amp Yellow |
L2+ Central ADAS Decision Module (CADM) MID* |
|
F70 |
– |
10 Amp Red |
Video Routing Module (VRM) / Port Power - USB IP (USB Ch Only) |
|
F71 |
– |
– |
Spare |
|
F72 |
– |
– |
Spare |
|
F73 |
– |
– |
Spare |
|
F74 |
– |
5 Amp Tan |
L2+ Intelligent Battery Sensor (IBS) - 2* |
|
F75 |
– |
– |
Spare |
|
F76 |
– |
– |
Spare |
|
F77 |
– |
– |
Spare |
|
F78 |
50 Amp Red |
– |
MOD IAir Suspension |
|
F79 |
– |
– |
Spare |
|
F80 |
– |
– |
Spare |
|
F81 |
– |
20 Amp Yellow |
Module Seat Heater Frt (PASS)* |
|
F82 |
– |
10 Amp Red |
SW Seat Heater (RR RT - RR LT)* |
|
F83 |
– |
– |
Spare |
|
F84 |
– |
– |
Spare |
|
F85 |
– |
– |
Spare |
|
F86 |
– |
15 Amp Blue |
Lumbar Support Driver - Passenger SW* |
|
F87 |
– |
– |
Spare |
|
F88 |
20 Amp Blue |
– |
MOD Door MUX Driver Rear - Smart Motor |
CAUTION:
When installing the power distribution center cover, it is important to ensure the cover is properly positioned and fully latched. Failure to do so may allow water to get into the power distribution center and possibly result in an electrical system failure.
BULB REPLACEMENT
REPLACEMENT BULBS, NAMES, AND PART NUMBERS
In the instance a bulb needs to be replaced, this section includes bulb description and replacement part numbers.
Interior Bulbs
Note:
The Interior lights are LED, for replacement of any LED lamps, see an authorized dealer.
Exterior Bulbs
Note:
The exterior lights are LED, for replacement of any LED lamps, see an authorized dealer.
Stored owner’s manualImported HTML from the shared Autotk manuals tables. Not an official Toyota site.